Harpoon traps for moles are a common pick because they are easy to see and set on top of the ground. These tools use sharp metal spikes that fire down into the dirt when a mole pushes against the trigger. While they work well in soft soil, they can be hard to use in clay or rocky yards where the spikes might get stuck. Scissor traps and Cinch traps offer other ways to solve the problem by going inside the tunnel instead of sitting on top. Harpoon-style traps are highly effective, poison-free, and reusable tools for mole control, but their success depends on where you place them. Each trap type has its own pros and cons based on your soil type and how much work you want to do.
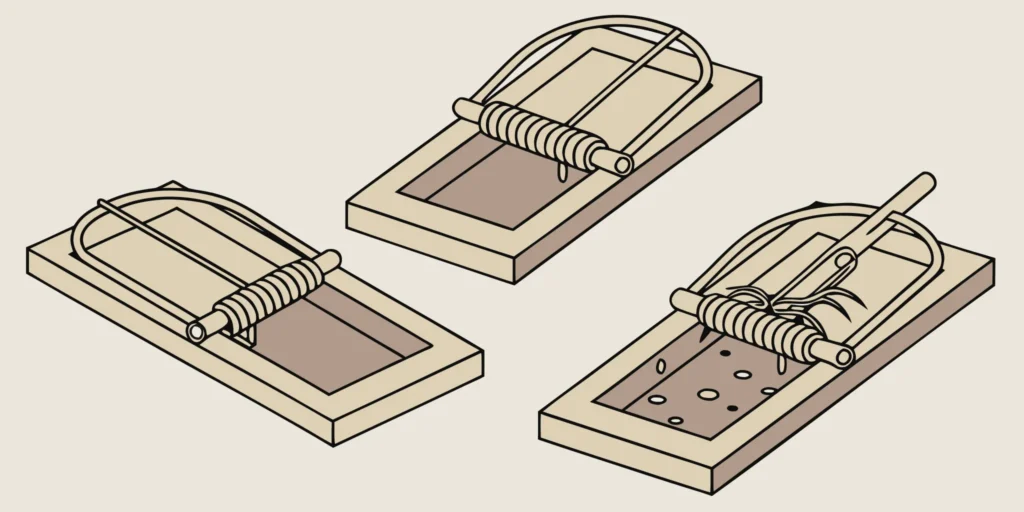
Harpoon traps for moles compared with scissor and Cinch traps
Trapping is a direct way to manage mole damage in your yard. While there are many tools, most people choose between harpoon, scissor, and Cinch traps. Each design has a unique way of catching the pest. Knowing how they work will help you find the right tool for your lawn.
How harpoon traps work
Harpoon-style mole traps use sharp spikes to catch moles from above. You place the trap over a surface tunnel that the mole uses often. When the mole moves through the tunnel, it pushes up on a trigger pan. This causes the spring-loaded spikes to drive into the soil. These traps are a common choice for many homeowners because they are easy to find and use.
But harpoon traps have some limits. They work best in soft soil and on surface tunnels. If the ground is hard or full of rocks, the spikes may not go in deep enough. You must also be careful with placement. If you do not line up the spikes well, the mole might move past the trap. You can learn more about best mole traps for lawns to see how they rank.
Scissor and Cinch trap designs
Scissor traps use two blades that snap shut when a mole hits the trigger. Like harpoon traps, you set them over a tunnel. They work well in many soil types but can be hard to set. You often need a lot of strength to pull the handles apart and lock the trigger. This can make them tough for some users to set up safely.
Cinch traps use a different method. These traps sit inside the tunnel instead of on top of it. They use a spring-loaded loop that catches the mole as it passes through. This in-tunnel design requires choosing a trap that fits the tunnel diameter. Tests by five major universities and the USDA ranked Cinch as an all-around top performer for capture and time efficiency. Learn more about that validation on the Cinch Traps story page.
| Feature. | Harpoon Trap. | Scissor Trap. | Cinch Trap. |
|---|---|---|---|
| Mechanism. | Spikes from above. | Blades from sides. | Internal tunnel loop. |
| Soil consideration. | Spears need a clear path. | Model must set securely. | Tunnel must fit trap size. |
| Placement. | Above a surface runway. | Across a prepared runway. | Inside an opened tunnel. |
| Setup focus. | Align spears and trigger. | Align jaws and trigger. | Follow the four-step setup. |
| Trigger check. | Visual from top. | Visual from top. | Visual indicator. |
When you pick a trap, think about your soil, the runway location, and how much tunnel preparation the design requires. University of Minnesota Extension guidance explains the importance of active-run placement. No matter which design you choose, inspect it regularly and follow its instructions.
How do harpoon traps for moles work?
Harpoon traps, also called plunger traps, use a spring and sharp spikes to catch moles. These tools are highly effective and poison-free. They sit on top of the ground above an active tunnel. When a mole swims through the soil, it pushes up on a trigger. This release sends the metal spikes down into the dirt to pin the pest. Most people like these traps because they are easy to see from a distance. You can tell if the trap has fired without walking all the way out to the yard.
Setting the trap above the tunnel
To use this trap, you must first find a straight run. This is usually a feeding tunnel near the surface. You push down a small part of the ridge with your foot to block the path. Next, you place the trap legs so they straddle the tunnel. The trigger pan should rest right on top of the soil you pushed down. Once you pull the spring handle up, the trap is set. When the mole tries to clear the blocked path, it hits the trigger and fires the spikes.
Benefits of harpoon designs
Many homeowners start with these tools because they do not require deep digging. Unlike some other best mole traps for lawns, the harpoon style stays mostly above the grass. This makes them safer to use in areas with hard or rocky soil where digging a large hole is hard. They are also made of tough steel and can be used for many years. Since they do not use bait, they are safe for the soil and do not attract other pests.
Limits of the harpoon style
While these traps work well, they have some flaws. They cause more soil disturbance than a Cinch mole trap, which sits entirely inside the run. If the ground is too soft, the spikes may not have enough force to go through the soil. If the ground is too hard, the spikes might get stuck before they reach the mole. You also need to check the trap every 24 hours. If you do not see success in two or three days, you should move the trap to a new active run.
When does a scissor trap make sense?
A scissor trap is a common tool for mole control. This trap has two sets of jaws that close like a pair of shears. You set it over a tunnel by pushing the jaws into the soil. It works when a mole tries to push through a blocked part of the run. This triggers the spring and snaps the jaws shut to catch the pest.
Best soil for scissor traps
These tools work best in loose or sandy soil. Since the jaws must move through the dirt to close, heavy clay can slow them down. If the soil is too hard, the jaws might not snap fast enough to catch the mole. You should check the ground before you set one. If it is soft and well-drained, a scissor-style tool is a strong choice.
In areas with very hard ground, many people look for harpoon traps for moles instead. Harpoon designs sit above the soil and fire downward. This can be easier to set when you do not want to push big jaws into the earth. Choosing the right tool based on your lawn type helps you get faster results.
How they compare to other designs
Scissor traps are sturdy and can last a long time. They are often made of steel and can handle many years of use. But they do need more work to set than some other types. You must dig into the tunnel and clear a path for the jaws. This can cause more soil disturbance than a tunnel-based Cinch mole trap, which slides directly into the run without extra digging.
When you are selecting the best mole trap, think about how much time you want to spend on setup. Scissor tools are reliable, but they may take a few more steps to get right. If you want a tool that is easy to move and reset, look for models with a simple trigger. Always check your traps at least every 24 hours to see if you have caught anything.
Things to consider before you buy
Think about the size of the tunnels in your yard. Most scissor traps are built for standard mole runs. If you have very small or very large tunnels, you might need a more adjustable tool. You should also check for a clear trigger flag. This lets you see if the trap has fired without having to pull it out of the ground. This saves time and keeps the tunnel intact.
It is also smart to look for tools that do not use poison. Mechanical traps are a clean way to handle pests. They are safe for the soil and can be used over and over. Make sure to buy a trap made from strong metal so it does not rust. Using a spray to protect the metal can help it last for a lifetime.
What makes the Cinch trap different?
When you look for the best mole traps for lawns, you often find two main types. Many people use plunger or harpoon traps for moles. These tools sit on top of the ground and push spikes down into the dirt. But Cinch Traps take a different path to get the job done. Our tools go right into the tunnel where the pest lives. This choice makes our traps work better and keeps your lawn looking great.
How the in-tunnel design works
Unlike harpoon traps for moles, the Cinch trap works from inside the run. It uses a strong spring to catch the pest fast. This design means you do not have to dig up your whole yard to set the tool. You only need a small hole to slide the trap into the tunnel. This keeps the ground firm and stops the mole from seeing any light or feeling a draft that might scare it away.
Proven by experts
We do not just say our traps work. Many schools have tested them in real fields. Five major universities and the USDA found our brand to be the best for catching moles fast. These experts looked at how many pests each trap caught and how much time it took. They named Cinch the top performer for both speed and success. This means you can trust the tool to clear your yard in less time than other brands.
Built to last a lifetime
Each Cinch trap is made by hand in Oregon using strong American steel. We use galvanized metal so the traps do not rust easily in wet soil. We believe in our work, so we offer a lifetime warranty on broken springs or wire flaws. To keep your trap in top shape, you should use a spray to stop rust. This care helps make sure your trap stays ready to use for many years to come. Professional pest control teams use our tools because they are tough and fast.
How to choose and set the right mole trap
Mating and feeding habits mean moles are active in your lawn all year. These pests have a high metabolic rate and eat nearly their own weight in food each day. This constant search for worms and grubs creates a vast network of tunnels that can ruin a garden. To stop the damage, you must act fast and use the right tools for the job.
Find the active tunnel
Before you set a trap, you must find where the mole is now digging. Moles use deep main runs and shallow feeding paths for their travel. To check if a run is in use, stomp down a small section of the dirt. If the mole is active, it will push the soil back up within 24 hours. This simple test saves you time and ensures you place your gear in the right spot.
Pick the right trap style
Most people pick between two main types of gear for their yard. You might see harpoon traps for moles at local shops, which fire sharp points into the dirt. While they can work, they often need a lot of soil to be moved. A better choice is a Cinch trap, which sits directly inside the tunnel. Our traps have made selecting the best mole trap easy for over 100 years.
Place the trap with care
Success depends on how well you place your trap in the run. If the trap is not set deep enough, the mole might just push dirt into it and trigger it early. You want the trigger to be right in the path of the mole’s nose. Our handmade steel traps feature a visual sign so you can tell from a distance if you caught something. This means you do not have to dig up your lawn just to check your progress.
- Confirm the pest by looking for mounds and tunnels to ensure you are not dealing with gophers or voles.
- Locate a main runway by using the stomp test to see which path the mole uses for travel each day.
- Open a small hole in the active tunnel that is just big enough for the trap to fit inside.
- Insert the trap and set the trigger following the safety steps in your guide.
- Wait 24 to 48 hours for the mole to pass through the tunnel and spring the trap.
- Check the trap each day and move it to a new spot if you do not have success after three days.
Experts agree that trapping is the best way to stop mole damage. If you follow these steps, you can expect to see results in just a few days. Always wear gloves to keep your scent off the gear and handle the springs with care. Proper care, like using a spray to stop rust, keeps your gear working for a long time. If you need more help, you can learn how to properly set a mole trap on our site.
Why is your mole trap not catching anything?
Setting a trap and finding it empty the next day is a common problem. You may have the best tools, but a few small errors can lead to a sprung trap with no catch. Most issues stem from where you place the trap or how you set it up. Knowing mole habits is the first step to getting better results. These pests can dig up to one foot per minute, so they move quickly through your lawn. If your trap stays empty, you must look at your process and the spot you chose.
Find active feeding tunnels
Moles dig many tunnels, but they do not use all of them every day. Some are just for one-time travel as they look for food. If you place a trap in an old run, the mole will never find it. To find a live tunnel, step on a small part of a surface run to cave it in. Check that spot the next day. If the mole has pushed the dirt back up, you know the tunnel is active and ready for a trap. Using active runs is the only way to ensure your trap is in the right path.
Active tunnels often follow straight paths near fences, walls, or walkways. These “main runs” link the nest to deeper feeding grounds where they hunt for worms. Surface tunnels that wind around in a zigzag pattern are often used just once. Focus your efforts on the straight, deep paths for the best chance of success. Moles prefer soil that is moist and cool, so look in shaded areas or near garden beds. If you find a run that stays open after you step on it, move on to another spot.
Fix setup errors for harpoon traps
When using harpoon traps for moles, the most common mistake is poor placement. These traps work by pushing sharp spikes through the soil when the mole moves past a trigger. If the soil is too hard or full of rocks, the spears may not go deep enough to work. You should clear any stones or thick roots from the path of the spears before you set the tool. This ensures the spikes can move freely when the spring fires.
You also need to make sure the trap legs sit firmly on the ground. If the trap moves when the trigger fires, it will lose its power and miss the target. Press the trap legs deep into the dirt on both sides of the run. This keeps the frame steady so the spring can drive the points down with full force. If you find the trap has fired but the tunnel is empty, the trigger pan might be too high. Adjust the pan so the mole must push against it to pass through the tunnel.
Check the trap on a schedule
Success does not always happen in the first few hours of your work. Most experts say to expect trapping success within two to three days. If you move the trap too soon, you might miss the mole on its next trip. But you should still check the trap at least once every 24 hours. A sprung trap that is empty means you need to reset it or move it a few inches.
If a trap stays set for more than three days with no catch, it is time to find a new spot. The mole may have moved to a different part of the yard to find more food. This often happens if the soil dries out or if the mole finds a better hunting ground. Keeping a close eye on your traps helps you learn which areas of your lawn have the most movement. Proper timing and a bit of patience are key to a clear yard.
Frequently Asked Questions
Are harpoon traps effective for catching moles?
Harpoon traps for moles are a popular and good choice for pest control. These tools use a spring to drive sharp points into the tunnel when a mole passes through. They are poison-free and you can use them for many years. According to University of Minnesota Extension, harpoon traps are very good for mole control. This design is simple to use and works well in many types of soil.
How do you set a harpoon mole trap?
To set a harpoon mole trap, first find an active tunnel by stepping on a small part and checking it later. Once you find a busy run, push down a small part of the soil. Place the trap legs over that spot. Push the trap down until the trigger rests on the dirt. Set the spring as shown in the steps. Proper placement is key for success. You can see setup tips on the Cinch Traps website.
How long does it take to catch a mole in a trap?
Most users can expect to catch a mole within two to three days after they set a trap the right way. If you do not see results in 48 hours, the mole might have moved to a new tunnel. You should check your traps every 24 hours to see if they have been sprung. Research from Clemson University shows that trapping success mostly happens within this short time.
What is the most successful mole trap for efficiency?
While many traps work, large tests show that some designs are better than others. Cinch traps are the only brand backed by five major schools and the USDA as the best for both catch and time speed. These handmade traps are built in the USA from strong steel. They have a clear sign that tells you when you have caught a mole. You can find these expert tools at the Cinch Traps store.
Ready to choose the right Cinch mole trap for your lawn?
Leaving moles alone will only lead to more holes and dead grass in your yard. Each day you wait gives them more time to dig new tunnels and ruin your lawn. You can stop the damage right now by picking the best mole trap that really works for your yard. Getting rid of moles early saves you from the high cost of fixing your grass later. Our handmade traps help you take back your garden with a tool you can trust for many years. Using a strong trap means you spend less time on yard work and more time loving your home. You should act fast to keep your yard looking its best all season long. No one wants to see their hard work ruined by a few pests.
Ready to choose? Contact our shop to choose your Cinch mole trap.
