To consistently outsmart a gopher, you need to start thinking like one. These animals aren’t just digging randomly; they follow predictable patterns driven by instinct. Their behavior is their biggest weakness, and it’s your greatest advantage. Instead of relying on guesswork, you can use their own habits to your benefit. This guide focuses on using gopher psychology to achieve success. You’ll learn how they react to disturbances, why they protect their tunnels so fiercely, and how this knowledge directly informs effective gopher tunnel trap placement. Let’s turn their predictable nature into your secret weapon for a gopher-free yard.
Key Takeaways
- Find the Gopher’s Highway: Your success hinges on finding the main tunnel, not just any tunnel. Identify fresh, fan-shaped mounds and use a probe to locate the active runway a few inches away from the dirt plug.
- Use a Two-Trap Ambush: Double your chances by placing two traps in the tunnel facing opposite directions. After setting them, completely cover the hole to block all light, using the gopher’s own instincts to lead it into the trap.
- Monitor and Adjust Your Strategy: Check your traps daily. If a trap is buried with dirt or remains untouched for two days, it’s a clear sign to move it to a new spot with fresh activity. Persistence and small adjustments are key.
How to Spot an Active Gopher Tunnel
Before you can set a trap, you need to think like a gopher. These little excavators are constantly digging, but they don’t use every tunnel all the time. Your goal is to find their main travel routes, the underground highways they use daily. Placing a trap in an old, abandoned tunnel is a waste of time, so a little detective work upfront will make all the difference. The key is learning to read the signs they leave behind on the surface.
An active tunnel system will have fresh mounds of dirt, which are your biggest clue. These mounds tell you not only that a gopher is present but also where they’ve been digging recently. By examining these mounds closely, you can pinpoint the exact location of the tunnel and set your trap for the best chance of success. It’s less about luck and more about knowing what to look for. If you’re ever unsure about what you’re seeing, our FAQs page can help clear up common questions about gopher behavior.
Look for Fresh Mounds of Dirt
The most obvious sign of a gopher is a fresh mound of dirt. Unlike old, weathered piles, new mounds have soil that is dark, moist, and finely sifted. They often appear in a fan or crescent shape, as the gopher pushes dirt out of the tunnel to one side. If you see a cluster of these fresh piles, you know you’ve found a gopher’s current work zone. Gophers create these fresh dirt piles as they expand their network, making them the perfect starting point for your trapping efforts. Pay attention to these mounds over a day or two to confirm the area is active before you start digging.
Find the Dirt Plug to Know the Tunnel’s Direction
Once you’ve located a fresh mound, look for a small circle of disturbed soil or a plug of dirt, often on the flat side of the fan-shaped pile. This is where the gopher sealed the tunnel entrance after kicking out all that dirt. The main tunnel doesn’t open into the mound itself; it runs nearby. As researchers at New Mexico State University note, “On a fresh mound, there’s usually a flat side. The tunnel goes away from this flat side.” Finding this plug is your map to the gopher’s runway, telling you exactly where to probe and dig to place your trap.
Gopher vs. Mole Damage: What’s the Difference?
It’s easy to confuse gopher and mole damage, but they leave different clues. Gophers create distinct, fan-shaped mounds with a dirt plug off to one side. Moles, on the other hand, create surface-level ridges that look like veins running through your lawn as they search for insects. Mole mounds are typically volcano-shaped and don’t have an obvious side plug. If you’re seeing raised ridges, you’re dealing with moles and will need a specific mole trap. But if you see those classic fan-shaped mounds, you’ve correctly identified your pest, and it’s time to get the right gopher trap for the job.
How to Find Gopher Tunnels for Trap Placement
Before you can set a trap, you have to play detective. Gophers are clever, but they leave behind a trail of clues. The key to successful trapping isn’t just finding a tunnel; it’s finding the right tunnel. Gophers create a network of passages, but they spend most of their time in a main runway. Placing your trap there is the fastest way to solve your gopher problem. Forget the flimsy mounds of dirt on the surface; your target lies a few inches below ground in their primary travel route. Let’s walk through how to pinpoint that perfect spot.
Use a Probe to Find the Main Tunnel
One of the most effective tools in your arsenal is a simple probe. You can use a dedicated gopher probe, a long screwdriver, or any sturdy metal rod. Start near a fresh, fan-shaped mound and begin probing the ground a few inches away from the dirt plug. Push the probe into the soil every inch or two. When you hit the tunnel, you’ll feel a sudden drop or give of about two inches. That distinct lack of resistance tells you you’ve found a hollow passageway. The main tunnel is typically located 4 to 18 inches from the mound, so be patient and methodical with your probing. Our How It Works guide has some great visuals to help you with this process.
Tell the Difference Between Main and Lateral Tunnels
Not all tunnels are created equal. Gophers dig two types: main tunnels and lateral tunnels. Lateral tunnels are short passages, usually less than 18 inches long, that branch off the main tunnel and lead to the mounds you see on the surface. Gophers use these primarily to push dirt out and then abandon them. The main tunnels are the gopher’s highways; they are longer, deeper, and used daily for traveling and foraging. You want to set your trap in a main tunnel. An easy way to tell the difference is by digging. If you find a tunnel that quickly dead-ends, it’s a lateral. A main tunnel will continue in two opposite directions.
Find Tunnels on Slopes and Uneven Ground
If your yard isn’t perfectly flat, you can use the terrain to your advantage. Gophers are efficient excavators, and they prefer to work with gravity, not against it. When you see mounds on a slope or hill, the main tunnel is almost always on the uphill side of the mounds. The gopher digs its main tunnel and then creates shorter, lateral tunnels to push the dirt downhill, forming the mounds you see. By focusing your search on the uphill side of the fresh dirt, you can locate the main runway much faster and avoid wasting time digging around lateral tunnels. This simple trick saves a lot of guesswork on uneven ground.
How Deep Do Gopher Tunnels Run?
Knowing how far down to look is crucial. Gopher tunnels typically run at a depth of 4 to 8 inches below the surface. However, this can change depending on the soil type, moisture levels, and the time of year. In loose, sandy soil, they might be a bit deeper. During a cold winter, they may dig below the frost line. This depth is important for two reasons. First, it helps you confirm you’ve found a tunnel when your probe sinks several inches. Second, it tells you how far you need to dig to properly place your gopher traps for an effective set.
What Tools Do You Need to Set a Gopher Trap?
Before you head out to the yard, gathering the right tools will make setting your gopher traps much smoother and more successful. Think of it like cooking; you want all your ingredients prepped and ready. Having the right gear on hand means you can work efficiently and safely, giving you the best shot at catching those pesky gophers on the first try. Let’s walk through exactly what you’ll need.
Probes and Digging Tools
First, you’ll need a way to find the tunnel and dig an opening. For probing, a 10-inch Phillips-head screwdriver works surprisingly well. Its blunt tip helps you feel the distinct drop when you break into an open tunnel. Try to avoid anything too heavy like rebar or splinter-prone materials like wood. Once you’ve located the tunnel, you’ll need a narrow trowel, about 1.75 inches wide, to dig. A smaller trowel helps you create a clean opening without disturbing the area too much, which is key to not spooking the gopher. We offer a specialized probe and digging tool designed specifically for this job.
Gloves and Safety Gear
This might seem obvious, but always wear gloves. You’ll be digging in the dirt, and it’s simply safer and more comfortable to protect your hands. While some people worry about leaving their scent on the trap, gophers aren’t particularly concerned about it. The gloves are for you, not for them. They protect you from blisters, dirt, and any sharp objects you might encounter while digging. Any sturdy pair of gardening gloves will do the trick, so just grab your favorite pair before you get started. Your hands will thank you later when you’re cleaning up.
Tethers and Stakes
To avoid losing your traps underground, you’ll want to secure them with tethers and stakes. A strong wire or cable works best for tethering the trap to a stake above ground. Don’t use string or rope, as a gopher could chew through it or it could degrade in the soil. For stakes, simple surveyor flags are great for marking the trap’s location so you can easily find it later. If you have coyotes or other curious animals in your area that might try to steal your trap, consider using a heavier stake made of rebar or wood for extra security.
Choose the Right Gopher Trap
The trap itself is your most important tool. If you’re new to trapping, starting with two to four traps is a good way to gain experience and cover more ground. When selecting a trap, look for one that is effective, durable, and easy to set. Our handmade gopher traps are built from galvanized steel to last a lifetime and are designed for a simple, no-fuss setup. A reliable trap is a worthwhile investment that saves you time and frustration, ensuring you have a tool you can count on season after season.
Understand Gopher Behavior to Trap Smarter
To consistently catch gophers, you need to think like one. These critters aren’t just randomly digging; they operate on instinct and follow predictable patterns. Understanding their behavior is your biggest advantage. Instead of just hoping a gopher stumbles into your trap, you can use their own habits against them to place traps with precision. When you know what makes a gopher tick, you can anticipate its next move and set yourself up for success. Their predictable nature is their weakness, and it’s what makes an effective trapping strategy possible. By learning about their territorial instincts and reactions to disturbances, you can turn a frustrating pest problem into a manageable task.
Know Their Solitary and Territorial Habits
Here’s some good news: gophers are loners. They are extremely territorial, and a single burrow system is almost always home to just one gopher. This means you aren’t dealing with a massive underground colony. Once you catch the one resident, that network of tunnels should be clear. This is a huge relief, as it turns a seemingly endless battle into a single, achievable goal. After you’ve removed the gopher, its territory remains vacant for a while, giving you time to reclaim your yard. Using the right gopher traps makes this one-and-done job much simpler, allowing you to resolve the issue quickly and effectively.
How Gophers React When You Disturb Their Tunnels
A gopher’s tunnel is its sanctuary, and it will instinctively protect it. When you dig into a tunnel and expose it to light and air, the gopher’s immediate priority is to seal the breach. It will gather dirt and push it toward the opening to create a new plug. This behavior is exactly what you’ll use to your advantage. A correctly placed trap intercepts the gopher as it works to repair its tunnel. It isn’t luck; it’s strategy. You are using the gopher’s own survival instincts to guide it directly into the trap. You can see how our traps work to capitalize on this very reaction, ensuring a quick and humane catch.
Why Gophers Avoid Traps and How to Outsmart Them
Gophers can learn from close calls. If a gopher has a bad experience with a trap that doesn’t work correctly, it can become “trap shy” and will actively avoid similar setups in the future. This is why your first attempt matters so much. Placing a durable, sensitive trap correctly from the start is your best bet. Don’t get discouraged if you don’t succeed on your first try, though. Research from experts at New Mexico State University shows that trapping is a skill that improves with practice. Pay close attention to your placement, make adjustments, and you’ll quickly learn what works best for the gophers in your yard.
How to Place Traps in Gopher Tunnels: A Step-by-Step Guide
Step 1: Find and Dig Into the Active Tunnel
First things first, you need to play detective. To catch a gopher, you have to find where it’s currently working. Look for the freshest mounds of dirt in your yard; they look like fan-shaped piles of soil next to a plugged hole. These are your hotspots. Once you’ve found a fresh mound, grab a probe or a long screwdriver. Start probing the ground about a foot away from the mound, on the same side as the dirt plug. You’re searching for the main tunnel. You’ll know you’ve found it when your probe suddenly sinks a few inches into the ground. This drop means you’ve broken through the roof of the tunnel. Mark that spot, because that’s where you’ll be setting your trap.
Step 2: Dig the Right-Sized Hole
Now that you’ve found the tunnel, it’s time to dig. Using a small shovel or trowel, carefully excavate a hole at the spot you marked. Your goal is to create an opening just large enough to fit the trap, usually about six to eight inches wide. Dig down until you’ve fully exposed the gopher’s runway. You’ll likely see the tunnel extending in two directions. Use your hands (with gloves, of course!) or a small tool to clear any loose dirt that fell inside. You want the path to be completely unobstructed so the gopher can travel through it freely and trigger the trap. A clean tunnel ensures your trap can do its job effectively.
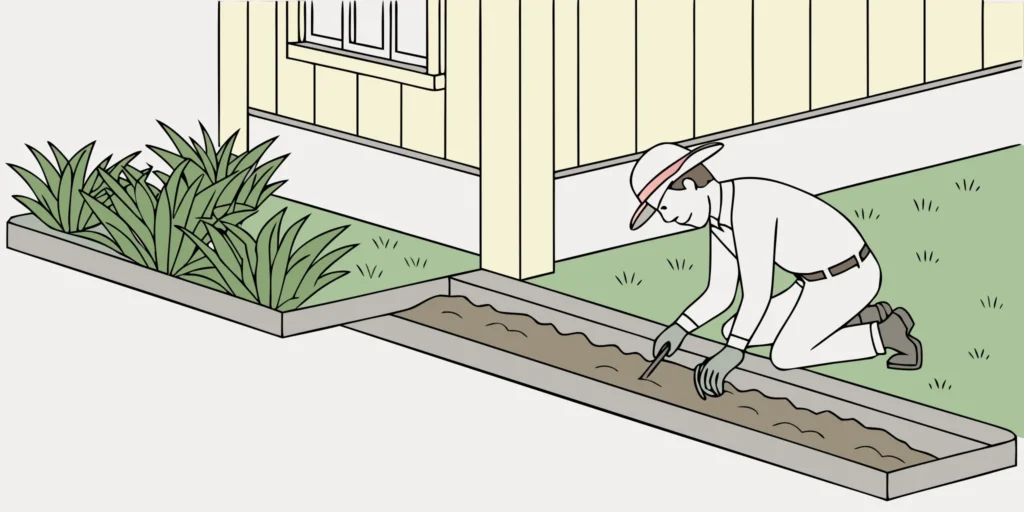
Step 3: Place the Trap Correctly in the Tunnel
This is the most important part of the process. Take your Cinch gopher trap and set it according to the instructions. Now, carefully place one trap into each side of the tunnel opening you’ve created, with the cinch loops pointing into the tunnel. Gophers can come from either direction, so using two traps facing opposite ways doubles your chances of a quick catch. Make sure the trap is placed snugly against the tunnel floor. The idea is to make the trap a seamless part of the tunnel, so the gopher runs right through it without suspicion. Our How It Works page has a great visual guide if you need a little extra help with placement.
Step 4: Cover the Hole to Block Light and Air
Gophers are sensitive to changes in their environment, especially light and air drafts in their dark tunnels. Their instinct is to immediately plug any openings. You can use this to your advantage. After your traps are in place, you need to cover the hole you dug. You can use a piece of plywood, a large stone, or even the sod plug you originally removed. The key is to block all light from entering the tunnel. This makes the gopher think the tunnel is secure and encourages it to run through, right into your trap. A small amount of dirt around the edges of your cover can help seal any light gaps.
Step 5: Secure and Mark Your Trap
You’ve done the hard work, so don’t let your trap disappear. Gophers can sometimes drag a trap further into the tunnel, or a predator might try to make off with your catch. To prevent this, secure your traps. Attach a wire or chain from the trap to a stake pushed firmly into the ground. This also makes it much easier to retrieve your traps later. Using a flag or a brightly colored stake as a marker is also a great idea, so you can easily find your trap locations when you come back to check them. You can find sturdy stakes and other helpful accessories to make the job even easier.
How Can You Maximize Your Catch Rate?
Setting a gopher trap is one thing; actually catching a gopher is another. If you’ve been setting traps with little to no success, don’t get discouraged. Often, a few small adjustments to your strategy are all it takes to turn things around. Gophers are creatures of habit, and understanding their behavior is the key to outsmarting them. By being more strategic about where, how, and when you place your traps, you can significantly increase your chances of success and reclaim your yard from these burrowing pests.
Target the Main Tunnel, Not the Laterals
To catch a gopher, you need to be on their main highway, not a side street. Gophers create extensive networks, but they use main tunnels for frequent travel and lateral tunnels primarily to push dirt out when creating mounds. Placing your trap in a lateral tunnel is a common mistake; the gopher may never return to it. Instead, use a probe to find the main runway, which is usually a few inches to a foot away from a fresh mound. The main tunnel is where the gopher spends its time, making it the perfect spot to set your trap for a successful catch.
Set Two Traps Facing Opposite Ways
You never know which direction a gopher will approach from when it comes to investigate a disturbance in its tunnel. To cover all your bases, always use two traps placed back-to-back. Once you’ve excavated a section of the main tunnel, place one trap facing into one end of the tunnel and a second trap facing the opposite direction. This simple technique effectively doubles your chances of a catch. A gopher returning to patch the hole will be caught no matter which side it comes from. This two-trap method is a non-negotiable for efficient and effective gopher control.
Use Several Traps in Active Areas
Don’t put all your eggs in one basket by using only a single trap. A single gopher can create dozens of mounds, and you may have more than one gopher creating havoc in your yard. To increase your odds, it’s best to set traps in multiple active areas. For a standard residential yard, starting with at least four gopher traps allows you to cover different tunnel systems simultaneously. If you have a larger property like a farm or acreage, you’ll need more. Using several traps shortens the time it takes to solve your gopher problem and helps you identify the most active zones.
Consider the Season
While you can trap gophers any time of year since they don’t hibernate, their activity does change with the seasons. Spring and fall are often the best times for trapping. The soil is moist and easy to dig, and gophers are most active near the surface, creating plenty of fresh mounds that make their tunnels easy to find. In the dead of winter or the heat of summer, they tend to burrow deeper to escape the temperatures, which can make locating their main tunnels a bit more challenging. However, the rule remains the same: if you see fresh activity, it’s always a good time to set a trap.
Check Your Traps Regularly
Once your traps are set, the job isn’t over. You need to check them regularly, ideally every 24 hours. Checking your traps daily serves a few important purposes. First, it allows for the humane dispatch of a caught gopher. Second, it lets you know if your placement is working. If a trap is sprung or buried in dirt without a catch, it tells you the gopher is active there and you should reset it. If a trap remains untouched for a couple of days, it’s a sign you should move it to a new location with fresher activity. This consistent monitoring is what separates frustrating attempts from successful trapping. For more tips, you can always review our frequently asked questions.
Common Gopher Trap Placement Mistakes to Avoid
Setting a gopher trap can feel like a game of strategy, and even small mistakes can mean the difference between success and an empty trap. If you’ve felt frustrated by a clever gopher that seems to outsmart you at every turn, you’re not alone. Often, the issue isn’t the trap itself but how and where it’s placed. By learning to sidestep a few common errors, you can significantly improve your results and reclaim your yard much faster. Let’s walk through the most frequent missteps so you can set your traps with confidence.
Setting Traps in Old, Inactive Tunnels
It’s tempting to place a trap in the first gopher mound you see, but not all tunnels are created equal. Gophers are constantly digging and abandoning old sections of their network. Setting a trap in an inactive tunnel is like waiting for a train on a decommissioned track; it’s a waste of your time and effort. To find where the gopher is currently working, start by raking away all the old dirt piles in your yard. Come back a day or two later and look for fresh mounds. These new piles of dirt are your signposts, pointing directly to an active tunnel system where your trap will be most effective.
Placing the Trap at the Wrong Depth
Proper trap depth is critical for a successful catch. If your trap is set too high or too low within the tunnel, the gopher may simply crawl under, over, or around it. The goal is to place the trap so it becomes a seamless part of the tunnel floor. When you dig your opening, make it just wide enough for your gopher trap. The trap’s trigger and jaws should sit snugly at the bottom of the tunnel, almost touching the tunnel walls. This ensures the gopher continues its path without suspicion and runs directly into the trigger mechanism. A perfect fit leaves no room for the gopher to maneuver around the trap.
Forgetting to Cover the Hole
Gophers are highly sensitive to changes in their dark, underground environment. If you leave the hole you dug open to the surface, the sudden influx of light and air acts like a giant warning sign. The gopher will either avoid that section of the tunnel entirely or immediately get to work plugging the hole with dirt, potentially burying your trap in the process. After you place your trap, always cover the opening completely. You can use the dirt plug you originally removed, a clump of sod, or a small piece of wood. The key is to block all light and restore the tunnel to its natural, dark state.
Not Using Enough Traps
A single gopher can create a surprisingly large network of tunnels, and relying on just one trap can make catching it a slow process. To maximize your chances, you need to cover the gopher’s main travel routes. When you locate a main runway, you’ll notice it extends in two opposite directions. The most effective strategy is to place two traps inside the tunnel, one facing each direction. This approach ensures you’ll catch the gopher regardless of which way it’s traveling. For larger infestations or extensive tunnel systems, using several sets of traps in different active areas is the best way to get results quickly.
How to Stay Safe When Setting Gopher Traps
Using gopher traps is an effective way to protect your yard, but safety should always be your first priority. While our traps are designed for a straightforward setup, taking a few extra precautions ensures that you, your family, and your pets remain safe throughout the process. It’s all about being mindful and creating a secure environment while you handle your gopher problem. Following these simple safety guidelines will give you peace of mind as you work to reclaim your lawn.
Keep Kids and Pets Safe
Your yard is a place for play and relaxation, so it’s essential to make sure your trapping activities don’t pose a risk to curious children or pets. The best practice is to place traps in areas that kids and animals can’t easily access. Clearly mark every spot where you’ve set a trap. You can use small flags, like the ones included in our trap accessory kits, to make the locations highly visible. It’s also a great idea to have a quick chat with your family, explaining that these marked areas are off-limits. As experts from the University of California advise, you should always keep traps out of reach of children and pets to prevent any accidents.
How to Handle and Dispose of a Caught Gopher
Once you’ve successfully caught a gopher, handling it properly is the next step. First and foremost, always wear a sturdy pair of gloves before touching the trap or the animal. This simple step protects you from direct contact and potential germs. After that, you’ll need to dispose of the gopher. Disposal regulations can vary quite a bit depending on where you live. Before you do anything, check your local wildlife or sanitation department’s guidelines. Some areas have specific rules for the disposal of trapped animals. Following these local guidelines ensures you are handling the situation both humanely and legally, as recommended by organizations like the Humane Society of the United States.
Why Isn’t My Gopher Trap Working?
It can be frustrating when you’ve done everything right, but your gopher trap remains empty. Don’t get discouraged. Trapping is a skill, and even seasoned pros have off days. Gophers are clever, but a few simple adjustments can make all the difference. If you’re staring at an empty trap, let’s walk through some common reasons why it might not be working and what you can do to fix it.
What to Do When Gophers Avoid Your Trap
If a gopher has a close call with a poorly set trap, it can become “trap shy” and learn to avoid them. This is why your initial trap placement is so important. A gopher might be plugging your trap with dirt because it detected a threat. This could be from too much light or air getting into the tunnel, or even human scent left on the trap. Always wear gloves and make sure the hole is completely covered. If you’re new to this, give yourself some grace. Most people get the hang of it after a day or so of practice. The key is to learn from each attempt and adjust your technique.
What if There’s No Activity for Days?
Patience is part of the process, but if several days go by without any action, it’s time to reassess. Check your traps frequently, at least once or twice a day. If you find a trap that has been buried under a mound of fresh dirt, that’s actually a good sign. It means the gopher is active in that tunnel, but it also means it detected your trap and decided to block it off. This is a clear signal that you need to move the trap. An untouched trap in a quiet tunnel for more than 48 hours also suggests it’s time to find a new, more active location.
When to Move Your Traps to a New Spot
If a trap is consistently buried or hasn’t caught anything after a couple of days, it’s time to relocate it. Your best bet is to find a new, fresh mound and probe for the main tunnel there. Remember, gophers are territorial, and usually only one occupies a burrow system (unless it’s a mother with her young). Once you catch that gopher, the tunnel system should be empty. Setting multiple gopher traps in different active areas of your yard can increase your chances of a quick catch and help you reclaim your lawn faster. Don’t give up; just move on to the next active tunnel.
What to Look for in a Gopher Trap
Choosing the right gopher trap can be the difference between a yard full of mounds and a successful catch. With so many options out there, it’s easy to feel overwhelmed. But a great trap doesn’t need to be complicated. It just needs to be effective, durable, and easy to use. Focusing on a few key features will help you pick a tool that gets the job done right the first time, saving you a lot of frustration down the road.
A Sensitive Trigger
Gophers are wary creatures. If a trap fails to catch them on the first encounter, they can become “trap shy,” making them much harder to deal with later. That’s why a sensitive trigger is non-negotiable. You need a trap that will spring with a light touch as the gopher pushes dirt through its tunnel. A mechanism that requires too much force will just get buried, leaving you with an empty trap and a still-active pest. Look for effective gopher traps designed for a quick and decisive catch to make sure your first attempt is your last.
Durable, Rust-Proof Materials
Your gopher trap will be spending its time underground, exposed to dirt, moisture, and changing weather. Traps made from flimsy materials or those prone to rust will quickly become unreliable. A rusty spring or joint can slow the trigger mechanism, rendering the trap useless. Opt for traps constructed from galvanized steel or other rust-proof materials that can withstand the elements season after season. It’s also a good idea to secure your traps to a stake with a strong wire or cable to prevent them from being lost or dragged away by predators.
Simple, Safe Setup
You shouldn’t need an engineering degree to set a gopher trap. A complicated setup process is not only frustrating but can also be unsafe. The best traps are designed for a straightforward process that keeps your hands safe and gets the trap in the ground quickly. You want a tool that is easy to arm and place in the tunnel without a struggle. A simple, effective design means you can set multiple traps efficiently, increasing your chances of success and letting you get back to your day.
Related Articles
- Gopher Tunnel Trap 101: Your Complete Guide
- Pocket Gopher Extermination: A Complete Guide
- How to Set a Trap in a Gopher Tunnel for Best Results
- Cinch Traps | The Best Mole & Gopher Trap
- How to Use a Professional Gopher Trap Effectively
Frequently Asked Questions
How can I be sure I’m dealing with a gopher and not a mole? The easiest way to tell is by looking at the dirt mounds. Gophers push dirt out of their tunnels to create fan-shaped or crescent-shaped mounds with a visible dirt plug off to one side. Moles, however, leave behind volcano-shaped mounds and create raised, vein-like ridges that run just under the surface of your lawn. If you see those distinct fan-shaped piles, you can be confident you have a gopher problem.
The gopher keeps burying my trap with dirt instead of getting caught. What’s happening? This is a classic gopher reaction and a sign that you’re in the right spot, but your setup needs a small adjustment. When a gopher senses a disturbance like light or air in its tunnel, its first instinct is to plug the hole with dirt. This usually means you haven’t completely covered the opening you dug. Use a piece of sod or wood to block all light, ensuring the tunnel is dark again. This encourages the gopher to run through the tunnel instead of just pushing dirt into it.
How long should I leave a trap in one spot before moving it? You should check your traps at least once a day. If a trap sits completely untouched for 48 hours, it’s a good sign that you should move it to a more active area with fresher mounds. However, if you find a trap buried in dirt, that means a gopher is active there. In that case, you should carefully reset the trap in the same spot and give it another day before deciding to relocate.
Do I need to worry about my scent getting on the trap? While this is a common concern in trapping, gophers are not particularly sensitive to human scent. Their instinct to seal a breach in their tunnel is much stronger than any wariness of a new smell. We still recommend wearing gloves, but this is mainly for your own safety and to keep your hands clean. Your focus should be on finding an active tunnel and placing the trap correctly, not on scent control.
Why is it so important to use two traps facing opposite directions? When you dig into a main tunnel, you are creating an opening in the gopher’s primary travel route. The gopher will eventually come to repair it, but you have no way of knowing which direction it will come from. By placing two traps back-to-back, one facing each way, you guarantee that you will catch the gopher regardless of its approach. This simple technique doubles your chances of success every time you set traps.
