After years of helping people deal with yard pests, I can tell you one thing for sure: when it comes to moles, most of the so-called solutions just don’t work. Repellents, sonic spikes, and cheap, flimsy traps are often a waste of time and money. The secret to getting rid of moles isn’t a secret at all; it’s about using the right tool for the job. A high-quality tunnel trap is the most reliable method for stopping moles in their tracks. In this guide, I’ll cut through the noise and show you exactly what to look for to find the best mole trap for tunnels. We’ll cover everything from durable construction to proper placement, giving you a clear, actionable plan to solve your mole problem effectively.
Key Takeaways
- Choose the right tool for the job: Your trap’s quality directly impacts your success, so opt for a durable, galvanized steel model. Steer clear of cheap plastic or flimsy scissor-jaw traps that often fail and can make moles harder to catch later.
- Find the mole’s highway: Setting a trap in the right place is crucial. Identify an active main tunnel by pressing down a small section and checking if it is repaired within a day, as this simple test ensures your trap is in a high-traffic area.
- Master the technique: Small details make a big difference in trapping. Always wear gloves to avoid leaving your scent, set multiple traps to increase your odds, and cover the opening completely to block all light, encouraging the mole to investigate.
What to Look for in a Tunnel Mole Trap
When you’re dealing with a mole problem, the last thing you want is a trap that adds to your frustration. Not all mole traps are created equal, and choosing the right one can make the difference between a mole-free lawn and a yard full of fresh mounds. To get the job done quickly and effectively, you need a trap that is powerful, reliable, and easy to handle. Let’s walk through the three most important features to look for when you’re ready to buy a tunnel mole trap.
Durable Construction
A mole trap is an investment, and you want one that will last for more than a single season. Look for traps made from high-quality, rust-resistant materials. We recommend traps constructed from galvanized steel, which ensures they can withstand the damp, dirty underground environment without breaking down. A robust design with powerful springs is also essential. This isn’t just about longevity; a strong trap provides the force needed for a quick and humane catch, which is the goal for any responsible property owner. A well-made mole trap will be a reliable tool in your shed for years to come.
A Sensitive Trigger
Moles are surprisingly quick, and they can easily push dirt ahead of them, accidentally setting off a trap without getting caught. This is why a sensitive and fast-acting trigger mechanism is so important. The trigger should be designed to respond instantly to the mole’s movement as it works to clear the blocked tunnel. A trap with a hair-trigger response ensures that the mole is captured efficiently, preventing near misses and false alarms. When you see how it works, you’ll notice the best traps have a simple yet effective trigger system that doesn’t get easily clogged with soil.
Simple to Set and Use
You shouldn’t need an engineering degree to set a mole trap. Ease of use is a critical factor that saves you time and improves your chances of success. Some traps are notoriously difficult to set, which can be both frustrating and dangerous. Tunnel traps, especially Duffus-style models, are often favored by professionals because they are powerful and straightforward to use. They are designed so their working parts won’t get jammed by stones or dirt, a common issue with other trap types. A trap that is simple to set allows you to place it confidently and move on, which is exactly what you need when you’re trying to manage an infestation.
Our Top Picks: The Best Mole Traps for Tunnels
When you’re dealing with a mole problem, targeting them where they live and work is the most direct path to success. Tunnel traps are designed specifically for this purpose, working inside the active runways moles use to travel through your yard. Instead of just dealing with the surface-level damage you see, these traps go straight to the source of the issue. This approach is far more effective than repellents or poisons, which can be unreliable and pose risks to pets and other wildlife. A well-placed tunnel trap offers a definitive, humane solution by ensuring a quick dispatch.
After looking at dozens of options, we’ve narrowed it down to three standout choices. We selected these based on their consistent performance, durable construction, and how easy they are for the average homeowner to use. Each one has its own strengths, but all are highly effective when used correctly. You don’t need to be a professional to get professional results with the right equipment. Choosing the right trap can mean the difference between reclaiming your yard and battling an endless cycle of molehills. Let’s get into our top picks for handling moles directly in their tunnels, so you can find the best fit for your situation and get back to enjoying your lawn.
1. Cinch Trap (Our #1 Choice)
There’s a reason the Cinch Trap is our top recommendation. It’s incredibly effective and built to last a lifetime, which is why we back it with a lifetime warranty. Each trap is handmade in Oregon from durable galvanized steel, so it won’t rust or fail you after a season. What really sets it apart is the simple, yet powerful, design. It’s easy enough for a beginner to set correctly in just a few minutes. This trap has been ranked #1 in university studies for its high catch rate, proving its performance in real-world conditions. If you want a reliable, straightforward solution that gets the job done without any fuss, this is the trap for you. You can explore our selection of mole traps to find the perfect fit for your yard.
2. Talpex Trap
The Talpex trap is a powerful scissor-style trap that’s a favorite among many pest control professionals. Its main advantage is an exceptionally strong spring mechanism that ensures a quick and humane dispatch. This makes it particularly effective for catching moles that may have become wary of other traps. If you’ve tried other methods without success, the sheer force of the Talpex can often outsmart even the most cautious moles. While it can be a bit more challenging to set than other models due to its strength, its performance is undeniable. According to the University of California’s guide to managing moles, different trap styles can be effective, and the Talpex is a classic example of a powerful scissor-jaw design.
3. Tunnel Trap (Wire or Duffus Trap)
The Tunnel Trap, often called a Duffus trap, is a classic design that has been trusted by gardeners and professionals for generations. This half-barrel trap is placed inside the mole run and is known for being easy to conceal. Its key benefit is that the trigger mechanism is protected from dirt and small stones, which means it’s less likely to get jammed compared to other styles. This makes it a very reliable option in various soil conditions. Because it’s simple and effective, the Tunnel Trap is a great tool to have in your pest control arsenal. It’s designed to be sensitive enough to trigger easily while being robust enough for repeated use. Its enclosed design helps ensure a quick capture once a mole moves through it.
How Do These Tunnel Traps Compare Head-to-Head?
Now that you’ve seen our top picks, let’s put them side-by-side to see how they really measure up. Each of these traps is a solid choice, but they have different strengths. The best one for your yard will depend on your soil, the mole’s behavior, and your own comfort level with setting traps. Understanding the specific way how it works for each design will help you make the right call for your situation. Let’s break down the pros and cons of each one.
Cinch Trap
What I love about the Cinch Trap is its perfect blend of effectiveness and user-friendliness. Handmade in Oregon from galvanized steel, these traps are built to last a lifetime, and they even come with a lifetime warranty to prove it. There’s a reason university studies have ranked them #1: they simply get the job done. Unlike other traps that can feel like you’re solving a puzzle, the Cinch Trap design is straightforward. This makes it a favorite for both first-timers and seasoned pros who need a reliable, durable, and simple solution without any fuss.
Talpex Trap
The Talpex trap has a clever design that makes it a great option for those particularly stubborn or trap-shy moles. Instead of relying on the mole to hit a trigger directly, it’s activated when the mole pushes dirt to repair its tunnel. It’s a powerful trap that doesn’t require much adjustment before you set it. The main drawback is that it can get jammed if you have rocky or stony soil. It’s also not the best for very shallow tunnels, and getting the placement just right is essential for it to work effectively.
Tunnel Trap (Duffus Trap)
The Tunnel Trap, often called a Duffus trap, is a classic for a reason. It has an impressive catch rate and can even snag two moles at once if you place it correctly. It works well in different types of soil and at various depths. Once it’s covered, it’s also safe to have around pets or farm animals. The tricky part can be the initial setup; it definitely has a learning curve. Another thing to keep in mind is that you can’t see if the trap has been sprung from a distance, so you’ll have to uncover it to check.
Mole Traps You Should Avoid
When you’re dealing with a mole problem, it’s tempting to grab the first trap you see at the hardware store. But trust me, not all mole traps are created equal. Choosing the wrong one can be a frustrating waste of time and money. More importantly, a low-quality trap can injure a mole without killing it, causing unnecessary suffering and making the animal “trap-shy,” which means it will learn to avoid traps altogether. This makes getting rid of your mole problem even harder down the road, as the mole becomes wise to your efforts.
To save you the headache, I’ve put together a list of common trap types that you should generally steer clear of. While some professional-grade versions of these might exist, the ones typically available to homeowners are often poorly made and unreliable. Understanding how an effective trap works is the first step to choosing the right tool for the job. A good trap is fast, humane, and built to last more than one season. The traps on this list often fail on all three counts. Let’s look at the specific types that usually cause more problems than they solve, so you can make an informed choice and get your yard back.
Scissor-Jaw Traps
You’ve probably seen scissor-jaw traps before, as they are a very common design. The idea is that two jaws snap shut when a mole triggers the mechanism. The problem is that the market is flooded with cheap, poorly made versions. These knock-offs often have weak springs that don’t have enough force to dispatch a mole quickly and humanely.
Instead of a quick kill, a weak spring can maim the animal, leading to prolonged suffering. It’s a cruel outcome that no one wants, and it’s completely avoidable by choosing a better-designed trap. If you’re committed to resolving your mole issue effectively, it’s best to avoid the risk associated with these flimsy scissor traps.
Cheap Plastic Traps
Walking through a garden center, you might spot brightly colored plastic mole traps that seem like a modern, easy solution. Unfortunately, these are often just cheap copies of more traditional and effective designs, like the tunnel trap. They are typically manufactured overseas with low-quality materials that can’t stand up to the job.
The plastic can become brittle, and the trigger mechanisms are rarely sensitive or reliable enough to work consistently. You’ll spend your time setting a trap that a mole will either ignore or easily bypass. This leads to a lot of frustration and a yard that is still full of mole tunnels. Investing in durable mole traps made of galvanized steel is a much more reliable path to success.
Spike and Harpoon Traps
Spike or harpoon traps are designed to impale a mole when it moves through its tunnel and pushes up on a trigger. On paper, it sounds effective, but in reality, these traps are often problematic. Like scissor traps, the cheap versions that dominate the market have flimsy parts and weak springs. This means the trap may not deploy with enough force to kill the mole instantly.
When a mole has a negative but non-lethal encounter with a trap, it learns to become wary. This is what experts call being “trap-shy.” The mole will start avoiding anything that looks or smells unnatural in its tunnels, making any future trapping attempts much more difficult. You can find more information about mole behavior in our FAQs.
Live Catch Traps
The idea of a live catch trap can feel like a more humane option, but they are often ineffective and can cause significant distress to the animal. Moles have a strong instinct to dig, and they will frequently just dig around or under a live trap placed in their tunnel. It’s a lot of effort for a tool that is so easily defeated.
Even if you do manage to catch a mole, you create a new set of problems. A captured mole will experience extreme stress, hunger, and thirst if the trap isn’t checked every few hours. Furthermore, relocating wildlife is often illegal and can just transfer your problem to someone else’s yard or introduce the mole to a territory where it can’t survive.
How to Find an Active Mole Tunnel
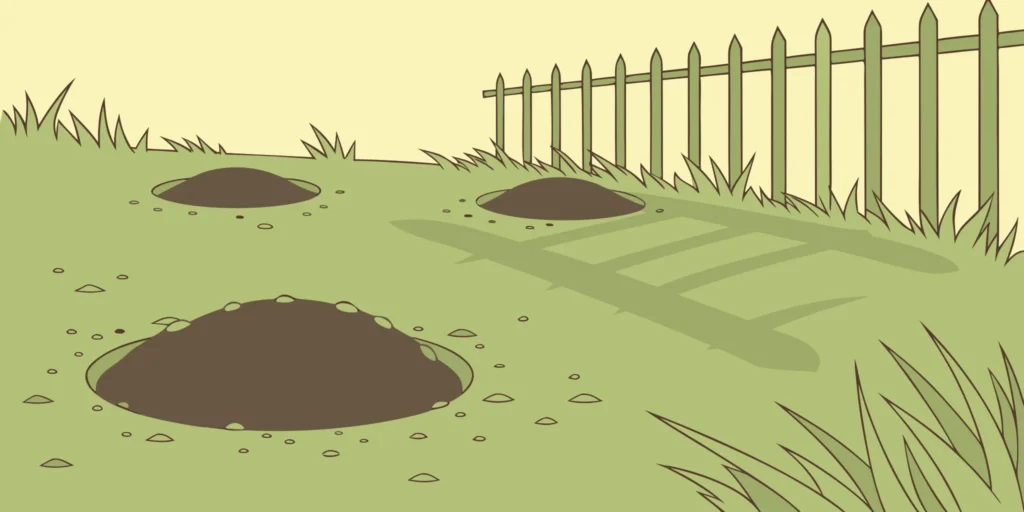
Setting a trap is simple, but setting it in the right place is what gets results. Moles create a complex network of tunnels, but they only use a fraction of them regularly. Placing your trap in a tunnel that the mole abandoned weeks ago won’t do you any good. The key is to find their current “highways,” the active main runways they use for daily travel. It’s a little bit of detective work that pays off big time. By spending a few minutes identifying an active tunnel, you dramatically increase your chances of catching the pest on the first try. Think of it like this: you wouldn’t wait for a bus at an old, out-of-service bus stop. You’d go to the one on the active route. It’s the same principle for trapping moles. They are creatures of habit and will consistently use the same main tunnels to move between feeding areas and their deeper dens. Your job is to find one of these busy thoroughfares. Don’t be discouraged by the number of ridges and mounds in your yard; most of those are temporary feeding tunnels. We’re looking for the main event. The good news is that finding these active tunnels is easier than you think, and it doesn’t require any special equipment. With a little observation, you can pinpoint the perfect spot and make your trapping efforts count. Here are a few simple methods to find a mole’s main travel route.
Look for Fresh Mounds of Soil
Those volcano-shaped piles of dirt in your yard are the most obvious sign of a mole problem. These mounds, or molehills, are created when a mole excavates deep tunnels and pushes the excess soil to the surface. Fresh mounds of soil are a clear indicator of active tunneling. Look for soil that is dark, damp, and loose, as opposed to older mounds that are dried out, flattened by rain, or have weeds growing on them. You’ll often see these mounds appear in a relatively straight line, which can help you trace the path of a primary runway. These main tunnels are the ideal place to set your trap for a quick catch.
Do the Press-Down Test
This is the most reliable way to confirm a tunnel is in use. Between the mounds, you’ll likely see raised ridges of soil snaking across your lawn. These are the surface feeding tunnels. To determine if a tunnel is active, press it down with your heel or hand to gently collapse a one-inch section. Be careful not to stomp the entire thing flat. Mark the spot with a stick or a small flag so you can find it again easily. Check back in 12 to 24 hours. If the mole has pushed the soil back up and reopened the tunnel, you’ve found an active runway. This is a five-star location for a trap because you’ve just confirmed the mole uses that path.
Mark and Monitor the Tunnel
If you have an extensive network of tunnels and aren’t sure where to start, this method helps you map out the mole’s most frequented routes. Using small garden flags or even popsicle sticks, mark several different tunnels throughout your yard. Gently press down a section of the tunnel next to each marker. Over the next few days, take a walk around your yard and see which markers have raised, repaired tunnels next to them. You’ll quickly notice a pattern. The tunnels that are repaired consistently are the main thoroughfares. Focusing your efforts on these areas will make your trapping much more effective and help you get rid of your pest problem with our proven mole traps.
How to Set a Tunnel Mole Trap in 5 Steps
Setting a trap correctly is just as important as choosing the right one. Even the best mole traps won’t work if they aren’t placed properly in an active tunnel. By following these five simple steps, you can set yourself up for success and reclaim your yard from these persistent diggers. We’ll walk you through everything from finding the perfect spot to checking your trap, making the process straightforward and effective.
Step 1: Find and Confirm an Active Tunnel
Moles are creatures of habit and tend to use the same main tunnels daily as their personal highways. Look for straight tunnels or ones that run along a permanent edge like a fence, sidewalk, or foundation. Once you spot a promising runway, you need to confirm it’s active. Gently press down a small section of the tunnel with your foot. If the mole repairs the damage by pushing the dirt back up within 24 to 48 hours, you’ve found a busy thoroughfare. This is the ideal location to set your trap.
Step 2: Carefully Open the Tunnel
After you’ve located an active tunnel, you’ll need to create an opening for the trap. Using a small trowel or gloved hands, carefully dig into the tunnel and clear out a section just large enough to fit your trap. Remove any loose dirt or clumps from the pathway so the mole has an unobstructed route. The goal is to make the opening look like a natural cave-in, which will encourage the mole to investigate. A clean opening also ensures the trap’s trigger can function without interference.
Step 3: Set and Place the Trap
Now it’s time to prepare your trap. Following the specific instructions for your model, carefully set the trigger mechanism. You can see exactly how it works with our traps by visiting our detailed guide page. Place the set trap firmly inside the opening you created, making sure it’s stable and sits flush with the bottom of the tunnel. This setup tricks the mole into thinking its tunnel has simply collapsed. When it moves in to clear the blockage, it will trigger the trap. This strategy effectively uses the mole’s own instincts against it.
Step 4: Cover and Mark Your Trap
Once the trap is in place, cover the opening completely to block all light from entering the tunnel. A piece of sod, a flat board, or an upside-down bucket works perfectly. This step reinforces the illusion of a natural cave-in and prevents the mole from becoming suspicious. Since a properly set tunnel trap sits below the surface, it’s very easy to forget its exact location. Always mark the spot with a stake or flag. Using visible marking flags helps you quickly find your trap again and check its status without disturbing the area.
Step 5: Check the Trap Daily
Consistency is crucial for effective mole trapping, so make it a habit to check your traps at least once a day. A quick look at your marker flag can often tell you if a trap has been sprung. If a few days pass without a catch, don’t worry. It likely just means the mole has temporarily changed its travel patterns. Simply pull the trap and move it to a different active tunnel you’ve identified. Regularly checking and relocating your traps as needed will significantly improve your success rate and help you resolve your mole problem much faster.
Common Mole Trapping Mistakes to Avoid
Even with the best trap on the market, a few simple mistakes can stand between you and a mole-free yard. Trapping isn’t just about the tool; it’s about the technique. Getting it right means solving your mole problem quickly and efficiently. Let’s walk through some of the most common errors I see people make so you can avoid the frustration and get straight to the results. By sidestepping these pitfalls, you’ll use your traps like a pro from day one.
Using Low-Quality Traps
I get it, it’s tempting to grab the cheapest trap on the shelf and hope for the best. But trust me, this is one area where you don’t want to cut corners. Low-quality traps are often unreliable, made from flimsy materials that bend or rust, and have triggers that fail. Not only will you be wasting your money, but a faulty trap can injure a mole without a clean catch. This makes the mole “trap-shy,” and it will be much harder to catch in the future. Investing in durable, effective mole traps made from galvanized steel ensures you have a tool that works correctly every single time and will last for years.
Setting Only One Trap
Moles are busy creatures with an extensive network of tunnels. Placing just one trap in a vast underground highway is like casting a single fishing line in a lake and expecting an instant bite. You might get lucky, but the odds are not in your favor. To really increase your chances of success, you need to think like a mole. They are constantly moving through their tunnels. By setting at least two traps in different active tunnels, you double your chances of intercepting the mole as it makes its rounds. This simple change in strategy can dramatically shorten the time it takes to solve your mole problem.
Leaving the Trap Uncovered
This is a small detail that makes a huge difference. Moles are sensitive to light and air drafts in their dark, sealed tunnels. Leaving a trap exposed to the open air is a dead giveaway that something is wrong. A mole will often just block off that part of the tunnel and dig a new route around your trap. Instead, you want to make the mole think its tunnel has simply caved in. After you place the trap, cover the opening completely with a board, a bucket, or a clump of sod to block all light. This triggers the mole’s natural instinct to come investigate and repair the “damage,” leading it directly into your trap.
Not Checking Traps Daily
Setting a trap and then forgetting about it is a recipe for failure. It’s important to check your traps every day. First, it’s the most humane approach, ensuring a caught animal isn’t left for an extended period. Second, it gives you valuable feedback. If a trap hasn’t been sprung after a day or two, it’s a strong indicator that you’ve chosen an inactive tunnel or the mole has moved on. Don’t get discouraged; simply pull the trap and move it to a new, active location. Consistent monitoring is key to understanding the mole’s patterns and finding the most productive spots in your yard.
Transferring Your Scent to the Trap
Moles have a very poor sense of sight, but they make up for it with a powerful sense of smell. They use it to find food and detect threats, including you. If you handle a trap with your bare hands, you’re covering it in your human scent, which is a major alarm bell for a mole. It can make them avoid the trap and the surrounding area completely. To prevent this, always wear gloves when you handle and set your traps. A simple pair of gardening gloves will do the trick. This prevents scent transfer and keeps the trap as a neutral, non-threatening part of the mole’s environment.
How to Maintain Your Mole Traps
A quality mole trap is a tool you can rely on for years, especially when it’s made from durable galvanized steel like ours. But even the toughest tools benefit from a little care. Proper maintenance isn’t just about longevity; it ensures your traps work as effectively as possible every time you set them. Think of it as protecting your investment and saving yourself future frustration. A few simple habits will keep your traps in top condition, ready to go whenever a new mole shows up to tear up your lawn. Taking these small steps after each use will make a big difference in your trapping success.
Clean Traps After Each Use
Moles have a very strong sense of smell and can be wary of anything that smells like a human. That’s why it’s so important to clean your traps and handle them with care. After you’ve caught a mole, remove it and wipe down the trap to get rid of any dirt or debris. Always wear gloves when you handle your traps, both for your own safety and to prevent your scent from getting on the metal. This simple step keeps the trap from spooking moles in the future. You can find sturdy gloves and other helpful accessories to make the job easier and cleaner.
Store Them Properly
When you’re not using your traps, storing them correctly will keep them in prime condition for the next time you need them. Our traps are built to last with a lifetime warranty, but leaving them outside exposed to the elements isn’t ideal. Find a dry spot in your garage, shed, or workshop to hang them or place them in a designated container. This prevents any potential rust over the long term and keeps them from getting bent, damaged, or buried under other equipment. Treating your mole traps like the valuable tools they are ensures they’ll be ready for action the moment you spot a new tunnel.
Inspect Them Regularly
Setting a trap is only half the battle; checking it consistently is what brings success. You should plan to check your traps every day. Moles are active creatures, and you want to know as soon as you’ve caught one. A daily check also tells you if you need to make adjustments. If a trap hasn’t been triggered after a day or two, it’s a good sign that you should move it to a more active tunnel. You often can’t tell if a trap has sprung from a distance, so you need to walk up to it for a closer look. Following a consistent process is key to how it works and will help you clear your yard of moles much faster.
Where to Buy the Best Tunnel Mole Traps
Once you’ve decided a tunnel trap is the right fit for your yard, the next step is finding a reliable place to buy one. The quality of your trap matters just as much as your placement technique, so it’s worth getting it from a source you can trust. A well-made trap will be more effective and last for seasons, saving you time and frustration.
The best place to get our handmade mole traps is right here on our website. When you buy directly from us, you’re getting a genuine Cinch Trap that has been crafted from durable galvanized steel in our Oregon workshop. We’ve been perfecting this design since 1909, and we stand behind every trap with a lifetime warranty. Buying direct ensures you receive the authentic product that has been proven effective in university studies, not a flimsy imitation.
Of course, sometimes you need a trap right away. Many local hardware stores, garden centers, and agricultural supply shops carry tunnel-style mole traps. Stopping by a local store allows you to see the trap’s construction firsthand before you buy. If you go this route, just be sure to inspect the trap for sturdy materials and a sensitive trigger mechanism. You can also find traps on large online marketplaces, but be mindful of the seller. Quality can vary, so read reviews carefully to make sure you’re purchasing a durable and effective tool for the job. If you have any questions about what makes a great trap, our FAQs page has plenty of answers.
Related Articles
- How Do Mole Traps Work? 4 Types Explained
- How to Set a Mole Trap: Video & Step-by-Step Guide
- How to Set a Scissor Claw Mole Trap in 5 Steps
- The Best Way to Catch a Mole: A Step-by-Step Guide
Frequently Asked Questions
I’ve set my trap, but I haven’t caught anything. What should I do? Don’t get discouraged, this is a common hurdle. The most likely reason is that the trap is in an inactive tunnel. Moles have many runways but only use a few as their main routes. Use the press-down test on a different tunnel to confirm it’s active, and then move your trap there. Also, double-check that you wore gloves to avoid leaving your scent and that you completely covered the trap opening to block all light.
Are tunnel traps safe to use in a yard with children and pets? Yes, when used correctly, they are one of the safer options available. Because the trap is placed inside the mole’s tunnel and then covered by a board or bucket, the mechanism is not exposed on the surface of your lawn. This keeps it out of the way of curious pets and kids. Just be sure to mark the location of your trap with a flag so everyone knows to leave that spot alone.
Is using a tunnel trap a humane way to get rid of moles? A well-made tunnel trap is designed to be a definitive and humane solution. A quality trap with a powerful spring, like the Cinch Trap, ensures an instant dispatch. This is a much more responsible outcome than using weak traps that can injure an animal or poisons that cause a slow, painful death. The goal is to resolve the problem quickly and cleanly.
How many mole traps should I buy for my yard? While you might catch a mole with a single trap, setting several at once dramatically increases your chances of success. For a typical suburban yard with a few active areas, I recommend starting with two or three traps. This allows you to cover different active tunnels at the same time, intercepting the mole much faster as it moves through its network.
Do I really need to wear gloves every time I handle the trap? Yes, this is a small step that makes a huge difference. Moles have a poor sense of sight, so they rely heavily on their sense of smell to detect danger. If you handle a trap with your bare hands, you leave behind a human scent that acts like a warning sign. A mole will simply avoid the trap or seal off that part of the tunnel. Wearing gloves keeps the trap neutral and makes it much more effective.
