If you’ve tried repellents, sonic spikes, or other gimmicks, you already know they rarely deliver on their promises. When you’re ready for a solution that actually works, it’s time to turn to a method trusted by gardeners for over a century: the scissor claw trap. This device is a model of efficiency, using the mole’s own behavior to solve your problem quickly and humanely. The secret isn’t magic; it’s technique. This article will walk you through the entire process, showing you precisely how to set a scissor claw mole trap for maximum effectiveness and finally put an end to the tunneling.
Key Takeaways
- Find the mole’s highway for a quick catch: Your success depends on placing traps in straight, main traveling tunnels, not the winding feeding paths. Confirm a tunnel is active by poking a small hole; if it’s repaired within a day, you’ve found the perfect spot.
- Create a seamless trap environment: Moles are sensitive, so make the trap feel like a natural part of their tunnel. Always wear gloves to mask your scent, ensure the trap fits snugly, and cover the opening completely to block out all light.
- Check and adjust your traps daily: A “set it and forget it” approach rarely works. A daily check allows you to handle a catch promptly or troubleshoot an empty trap. If a trap is filled with dirt or untouched for two days, reposition it in a new active location.
What is a Scissor Claw Mole Trap?
If you’re tired of seeing raised tunnels crisscrossing your lawn, you’ve probably started looking for a solution that actually works. The scissor claw trap is a classic for a reason. It’s one of the most effective and widely used types of mole traps on the market, trusted by gardeners and professionals alike. Think of it as a powerful, spring-loaded device designed to work underground, right in the mole’s own territory. Its name perfectly describes its function: two strong jaws close together like a pair of scissors when triggered.
At its core, a scissor trap has just a few key parts: two sets of jaws, a trigger plate, and a setting mechanism that holds the jaws open. The entire trap is placed directly into an active mole tunnel, completely out of sight. This makes it a discreet option that gets the job done without cluttering your yard. Its simple, powerful mechanical design has been proven for over a century, offering a reliable way to handle mole problems without resorting to chemicals or poisons. It’s a straightforward tool that uses the mole’s natural behavior to solve your problem quickly.
How scissor claw traps work
The beauty of a scissor claw trap lies in its simple and effective design. It works by intercepting a mole as it moves through its underground runway. Once you’ve found an active tunnel, you place the set trap right in the mole’s path. The trap is designed to blend seamlessly into the mole’s environment, so the unsuspecting pest continues its journey without alarm. As the mole moves through the tunnel, it naturally pushes loose dirt ahead of it. When it shoves this soil against the trap’s trigger plate, the setting mechanism releases, and the powerful jaws snap shut instantly. The process is fast, effective, and humane, making it a top choice for controlling mole populations.
Why choose a scissor claw trap
There are several solid reasons why a scissor claw trap is an excellent choice for your yard. First and foremost, they are incredibly effective. Many people report catching a mole within a day or two of setting their traps correctly. They are also built to last. Quality traps made from galvanized steel resist rust and are designed for repeated use, making them a smart investment for long-term mole control. Another major advantage is their versatility. Scissor claw traps work well in various soil conditions, from loose and sandy to firm clay. Because they are set underground, they are also a safer option for yards where children and pets play, as the working parts are concealed beneath the surface.
Find Active Mole Tunnels
Before you can set a trap, you need to play detective. Moles create an extensive network of underground tunnels, but they don’t use all of them regularly. Some are main highways they travel daily, while others are temporary feeding paths they abandon. Placing your trap in a deserted tunnel is a common mistake that leads to zero results. The key to success is finding an active, frequently used runway.
Think of it like this: you wouldn’t set up a roadblock on a street that’s closed for construction. You want to find the busiest intersection. By identifying a main tunnel, you dramatically increase the chances of a mole encountering your trap. Luckily, figuring out which tunnels are currently in use is a straightforward process. It just takes a little observation and a simple test to confirm your suspicions. Once you pinpoint an active tunnel, you’re setting yourself up for a successful catch with your mole traps.
Spot the signs of fresh activity
Your first clue is the appearance of the tunnels themselves. Active mole tunnels are the raised ridges you see crisscrossing your lawn. Look for “new, elevated, or soft ridges of earth that have been pushed up recently.” These surface tunnels will feel soft and spongy under your foot because the soil is freshly disturbed. Older, inactive tunnels will look more weathered and feel firm or flattened when you step on them. You should also look for molehills, which are the volcano-shaped mounds of dirt. While you won’t set a trap in the mound itself, a fresh molehill is a sure sign that a mole is active nearby.
Test tunnels with a probe
Once you’ve located a promising-looking tunnel, you need to confirm a mole is actually using it. The easiest way is with a simple poke test. Take a small stick, a screwdriver, or your finger and gently poke a one-inch hole into the top of the tunnel, creating an opening. Moles dislike having their tunnels exposed to light and air, so if the tunnel is active, they will repair the damage. Mark the spot with a small flag or stick so you can find it again. Check back in 12 to 24 hours. “If the hole is plugged up the next day, a mole has been through, and the tunnel is active.” If the hole is still open, that tunnel is likely abandoned, and you should move on to test another spot.
Gather Your Trapping Tools
Before you head out to the yard, let’s make sure you have everything you need. Getting your tools ready beforehand makes the whole process smoother and more effective. Having the right equipment on hand means you can find a tunnel, prepare the ground, and set your trap quickly and correctly without running back and forth to the garage. It’s a simple step that sets you up for success from the very beginning.
Your essential equipment checklist
To get the job done right, you’ll want a small but specific set of tools. Think of it as your mole-trapping toolkit. First and foremost, you need a high-quality mole trap. You’ll also need a probe to locate the active tunnels, a small trowel for digging, a pair of durable gloves, and some marker flags. These flags are essential for remembering where you’ve placed your traps. Having these items ready will help you work efficiently and increase your chances of catching that pesky mole.
Use gloves to mask your scent
This might sound like a small detail, but it’s a game-changer: always wear gloves. Moles have an incredibly sensitive sense of smell and can easily detect human scent left behind on a trap or in the tunnel. If a mole smells you, it will likely avoid the area and your trap altogether. By wearing gloves from the moment you start handling your equipment, you mask your scent and make the trap seem like a natural part of the environment. This simple precaution can be the difference between an empty trap and a successful catch.
Don’t forget markers and tools
Once you set a trap, it’s surprisingly easy to forget its exact location, especially in a large yard or after a few days. That’s where marker flags come in. Placing a flag next to each trap helps you quickly find them again for daily checks. This practice is crucial for monitoring your traps and knowing when you’ve caught a mole. You can find flags and other helpful trapping accessories to complete your kit. Trust me, you’ll thank yourself later for taking a few extra seconds to mark the spot.
Prepare the Mole Tunnel
Once you’ve located an active tunnel, the next step is to prepare it for the trap. This is where a little precision goes a long way. A well-prepared tunnel ensures the mole travels directly into your trap instead of digging around it. Taking a few extra minutes here can make all the difference between a successful catch and a trap filled with dirt. Let’s walk through how to get it just right.
Find a straight section of tunnel
Moles create a network of tunnels, but not all of them are created equal. They have main “highways” or traveling runs that they use frequently to move between feeding areas. These are your prime locations for setting a trap. Look for a long, straight tunnel, often found alongside a driveway, foundation, or fence line. Setting your mole traps in these high-traffic areas dramatically increases your odds of a quick catch. Avoid the winding, shallow tunnels in the middle of your lawn, as those are typically temporary feeding paths that a mole might only use once.
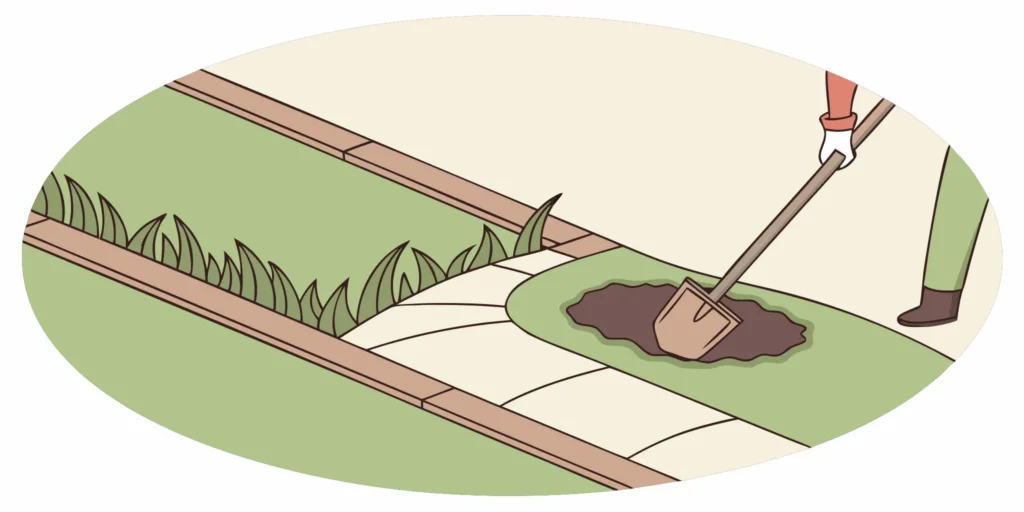
Create the trap opening
After you’ve picked your spot, it’s time to create an opening for the trap. Using a small garden trowel or a hori-hori knife, carefully cut a section of sod out directly over the tunnel. The hole should be just wide enough to fit the scissor trap. You want a snug fit. The goal is to interrupt the tunnel without completely destroying it. Think of it like performing minor surgery on your lawn. You can see a great visual of this on our How It Works page. Once you’ve made the opening, set the piece of sod aside; you can use it to cover the trap later.
Clear and compact the soil
This step is absolutely crucial. Moles are sensitive creatures and will immediately notice loose dirt or obstructions in their path. Their instinct is to plug the tunnel with that loose soil, which can trigger your trap without catching the mole. Use your fingers (with gloves on, of course) or a small tool to clear any debris from the bottom of the tunnel. Gently press down on the bottom and sides of the run to create a firm, clear pathway. A solid, compacted tunnel encourages the mole to pass through the trap, not try to dig under it. If you find your trap is constantly getting filled with dirt, our FAQs can help troubleshoot.
Position and Set the Trap
You’ve done the prep work, and now it’s time for the main event. Placing and setting your trap correctly is the most critical step in the entire process. It requires a bit of precision, but once you get the hang of it, you’ll be able to set traps quickly and confidently. The goal is to position the trap so it becomes a natural part of the tunnel, catching the mole as it moves along its regular route. Let’s walk through exactly how to do it.
Follow these step-by-step instructions
First, make sure you’re setting your trap in a main traveling run, not a shallow feeding tunnel. Moles use these deeper runways as their highways, so they pass through them frequently. This gives you the best chance for a quick catch. With your gloves on, carefully lower the unset trap into the hole you dug. The trap should straddle the tunnel, with the trigger pan resting just above the soil. The idea is for the mole to move through the trap from either direction. Our How It Works page has some great visuals if you need a reference.
Use setting tongs for safety and depth
Setting tongs are your best friend for this job. Scissor traps have powerful springs, and tongs allow you to safely compress them and open the jaws without putting your fingers at risk. Once the trap is open, lock the safety catch in place. Tongs also give you much better control as you lower the armed trap into position. You can place it at the perfect depth, ensuring the trigger mechanism is set just right inside the tunnel. This precision is difficult to achieve by hand and makes a huge difference in your success rate. You can find the right trapping accessories to make the job easier and safer.
Align the blades in the tunnel
Proper alignment is everything. As you place the set trap, make sure the scissor-like jaws are positioned on the outside of the mole’s tunnel. The tunnel itself should pass directly between the open jaws, with the trigger pan sitting in the middle. You want the mole’s path to be completely unobstructed. The mole will sense the small bit of disturbed soil from your digging and try to push it out of the way, pushing up on the trigger pan and activating the trap. If the jaws block the tunnel, the mole will likely just dig around it. Take a moment to ensure your mole trap is perfectly placed for success.
Verify Your Trap is Set Correctly
Placing the trap is half the battle, but confirming it’s set correctly is what gets the job done. A few extra moments of verification can make all the difference between an empty trap and a captured mole. Moles are sensitive to disturbances in their tunnels, and a poorly set trap can cause them to simply dig around it. To give yourself the best chance of success, you need to make the trap feel like a normal part of the tunnel. These next few steps will help you fine-tune the placement and ensure the mole walks right into your trap, not around it.
Test the trigger mechanism
The trigger is the most important part of the trap. It needs to sit in a tight-fitting hole with no loose soil that could jam the mechanism. After placing your mole trap, press down firmly on the ground around it to compact the soil and set the trap’s legs securely into the tunnel walls. When the mole encounters a solid, clear path, it’s more likely to move through the trap instead of trying to dig a new route. A snug fit ensures the slightest pressure from the mole will activate the trigger.
Cover the trap to block light
Moles spend their lives in darkness and are extremely sensitive to light. An uncovered trap lets light and air into their tunnel, which is a major red flag for them. This signals danger and will likely cause the mole to avoid that area entirely. To prevent this, always cover your set trap. You can use a bucket, a large piece of sod, or a wooden board to completely block any light from entering the hole. This simple step makes the tunnel feel safe and normal, encouraging the mole to continue its path straight through the trap.
Block the tunnel to guide the mole
For an extra edge, you can strategically guide the mole toward your trap. Create a small obstruction in the tunnel just past the trap using a small stone or a clump of compacted soil. When the mole encounters this minor blockage, its instinct is to push through it to clear the path. This forward-pushing motion directs it right into the trap’s trigger. It’s a clever technique that uses the mole’s own behavior against it, increasing your odds of a successful catch. For more pro tips, check out our How It Works guide.
Maintain Your Traps After Setting
Setting your traps is a great first step, but consistent monitoring is what truly leads to success. A “set it and forget it” approach rarely works with these clever creatures. By paying a little attention to your traps each day, you can significantly increase your chances of catching the culprit and reclaiming your yard. Think of it as a simple routine: a quick daily check, a little tidying up if needed, and making sure you can always find your traps. These small habits make a huge difference and ensure your high-quality mole traps perform at their best. This proactive approach keeps you one step ahead of these persistent pests and helps you understand their patterns better. It’s less about heavy lifting and more about smart, consistent observation. Following these simple maintenance steps will turn a well-set trap into a successful catch, time and time again. It also prevents you from leaving a sprung trap in the ground for too long, which is both ineffective and inhumane. A well-maintained trap is an effective trap, and this section will walk you through exactly how to do it.
Check your traps daily
Make it a habit to check your traps every morning. A quick visual inspection is usually all you need. A sprung trap is easy to spot, as the top handles will have moved from a vertical position to form a triangle. Checking daily allows you to deal with a captured mole promptly and reset the trap to catch others that might be in the area. If a trap hasn’t been triggered after a couple of days, it might be a sign that the tunnel is no longer active, and you should consider moving it. This simple daily walk-through ensures you stay on top of the situation and can react quickly, which is the key to effective mole control.
Clean and reposition as needed
If a trap remains untouched for a few days or gets filled with dirt, it’s time for an adjustment. Moles will often just plug a trap with soil if it’s not set perfectly. The trap needs to be in a tight-fitting hole with no loose soil in the tunnel. If you find a dirt-clogged trap, pull it out, clear away the loose soil, and compact the tunnel. Then, carefully reset the trap, ensuring the legs are set firmly into the sides of the hole. This makes it easier for the mole to move through the trap instead of trying to go around it or push dirt into it.
Mark your trap locations
It’s surprisingly easy to forget exactly where you placed a trap, especially if you have a large yard or have set multiple traps. To save yourself from hunting around later, always mark your trap locations. A simple garden flag, a painted stick, or even a brightly colored ribbon tied to a nearby branch will do the trick. Marking your traps makes your daily checks faster and more efficient. It also prevents you from accidentally stepping on a trap while mowing the lawn or gardening. This small step keeps you organized and helps you track which tunnels are most active, giving you valuable information for future trap placements.
Why Isn’t My Trap Catching Moles?
It’s frustrating to set a trap with high hopes, only to find it empty or filled with dirt day after day. If your trap isn’t catching anything, don’t give up. Usually, a few small adjustments are all it takes to solve the problem. Let’s walk through the most common reasons a trap fails and how you can fix them to get your yard back.
Avoid common setup mistakes
One of the biggest hurdles is choosing the right location. Moles create complex networks of surface-level feeding tunnels and deeper, main traveling tunnels. While you see more activity in the feeding areas, you’ll have much better luck setting your mole traps in the main traveling runs. These are the highways the moles use frequently. Another simple but crucial step is to wear gloves. Moles have a keen sense of smell, and leaving your scent on the trap can make them avoid it entirely. Always handle your traps with gloves to keep them free of human odors.
Troubleshoot placement and timing
A mole’s world is dark and enclosed. Any light or air that gets into their tunnel signals danger, causing them to block the run with dirt instead of proceeding. After you place the trap, make sure you pack soil back around it to completely block any outside light. The trap should fit snugly within the tunnel walls. If the opening is too large, the mole might try to go around it. The goal is to make the trap feel like a normal part of the tunnel, so the mole passes through without suspicion. You can find detailed diagrams on our How It Works page to see the correct placement.
Fix issues with loose soil or fit
Is the mole just pushing dirt into your trap? This usually means the trap isn’t set firmly enough or there’s loose soil in the tunnel. Before placing the trap, clear out any debris and compact the bottom of the run. This forces the mole to go through the trap, not under it. The trap’s legs should be pressed firmly into the sides of the tunnel. Sometimes, you may need to carve a small groove for the setting ring so it doesn’t sit too high and obstruct the path. By making the trap the path of least resistance, you ensure the mole triggers it correctly.
Best Practices for Trapping Success
Setting a trap correctly is the most important step, but a few extra strategies can make a huge difference in your results. You’ve done the hard work of finding the tunnels and setting the trap, so now it’s time to make sure your efforts pay off. By using a few traps, checking them regularly, and paying attention to the weather, you can solve your mole problem much more quickly. These simple practices will help you outsmart even the most stubborn moles and get your yard back to normal.
Use multiple traps for better coverage
If you’re dealing with an extensive network of tunnels, relying on a single trap can be a slow process. Moles create complex underground highways, so placing traps in several active areas increases your odds of a quick capture. Focus on the main “traveling runs” rather than the winding feeding tunnels, as moles use these straightaways more frequently. Having a few high-quality mole traps on hand allows you to cover different parts of your yard at the same time. This strategic approach helps you intercept moles no matter which route they take, solving the problem faster.
Time your efforts for the best results
Consistency is key when it comes to trapping. Plan to check your traps at least once a day, or even twice if you can. Regular checks allow you to remove a captured mole promptly and reset the trap for the next one. It also helps you spot a triggered trap without a catch, which might mean you need to adjust its placement. Moles are most active in the spring and fall when the soil is damp, making these the best seasons for trapping. Following a consistent trapping process during these peak times will give you the upper hand.
Consider the weather and season
The environment plays a big role in trapping success. Moles prefer moist, pliable soil, so trapping after a light rain can be very effective. Avoid trapping in frozen or extremely dry ground, as moles will dig deeper and be harder to catch. Heavy rain can also flood tunnels or cause them to collapse, so you may need to reposition your traps. This is where a durable trap really shines. Cinch Traps are made from galvanized steel, so they hold up in harsh weather and work reliably season after season, ensuring you’re always ready for ideal trapping conditions.
Related Articles
- The Best Way to Catch a Mole: A Step-by-Step Guide
- Easy Mole Trap 101: The Ultimate 2026 Guide
- 7 Things to Know Before You Buy Mole Trap Online
Frequently Asked Questions
How long should I wait before moving an empty trap? If a trap hasn’t been triggered after two or three days, it’s time to move it. An empty trap is usually a sign that you’ve placed it in a tunnel that isn’t a main runway. Moles have many feeding paths they only use once. Use the poke test to find a new, confirmed active tunnel and reset your trap there. Sometimes it takes a couple of tries to find their main route.
Are scissor claw traps safe to use in a yard with children or pets? Because the entire trap mechanism is set underground, it is a much safer choice for yards where kids and pets play. The working parts are concealed below the surface, out of sight and reach. For extra peace of mind, you can cover the trap opening with a bucket or a flat board to prevent a curious pet or child from digging in that spot.
Do I need to use any kind of bait with a scissor claw trap? No, you don’t need to use any bait with these traps. Their design works with the mole’s natural instinct to keep its tunnels clear. The mole isn’t lured by food; it triggers the trap simply by pushing dirt and trying to reopen its path. This makes the process very straightforward since you don’t have to worry about handling or replacing any bait.
How can I tell if I have moles or gophers? It’s easy to confuse the two, but they leave different signs. Moles create raised, vein-like tunnels just under the surface of your lawn and push up volcano-shaped mounds of dirt. Gophers do not create surface tunnels. Instead, they leave fan-shaped or crescent-shaped mounds of soil that have a distinct dirt plug on one side where they’ve sealed the hole. Knowing which pest you have is key to choosing the right trap.
What should I do after I’ve caught a mole? After you’ve caught a mole, you should dispose of it according to your local guidelines. Most people double-bag the mole and place it in their outdoor trash. It’s a good idea to reset the trap in the same location right away. It is very common for multiple moles to use the same tunnel system, so your work might not be done after the first catch.
