If you needed to hang a heavy mirror, you wouldn’t use a thumbtack. You’d find a sturdy anchor and screw because you know that using the right tool is the only way to get the job done correctly and safely. The same logic applies to getting rid of moles. Grabbing a flimsy, cheap trap from a big-box store is the thumbtack approach—it’s bound to fail and leave you with a bigger problem. To truly solve your mole issue, you need a reliable tool built for the task. This article will guide you through the most effective mole traps, explaining the features that matter so you can invest in a real solution.
Key Takeaways
- Choose a durable trap over a cheap one: A well-made trap from materials like galvanized steel has a sensitive trigger and will last for years, making it a much better investment than a flimsy one that might fail.
- Focus on active tunnels, not just any tunnel: Moles have main travel routes. Confirm a tunnel is active by pressing down a small section; if it’s pushed back up within a day, you’ve found the perfect spot to set your trap.
- Improve your odds with smart tactics: Use multiple traps in a single runway facing opposite directions to catch moles traveling either way. Always cover your set trap with a bucket or board to block light and make the tunnel feel undisturbed.
What Makes a Mole Trap Effective?
Success in mole trapping comes down to two things: using a well-designed trap and understanding how moles think. A great trap is only half the equation. If you don’t place it where moles are active, it won’t do you much good. Combining a quality tool with a bit of knowledge about mole behavior is the secret to reclaiming your yard. Before you even think about setting a trap, let’s cover the features that matter and the mole habits you need to know.
Features That Define a Great Trap
The best mole traps are designed to work with a mole’s natural instincts. Moles are constantly clearing debris from their tunnels, so an effective trap uses this behavior to its advantage, triggering with a simple bump as the mole pushes dirt. Look for professional-grade mole traps made from durable materials like galvanized steel. A sturdy trap won’t rust or break after one season, making it a worthwhile investment. A flimsy trap, on the other hand, can misfire and create a “trap-shy” mole, which is much harder to catch later. A sensitive trigger mechanism and a design that fits snugly within the tunnel are also crucial for a quick and humane catch.
Understanding How Moles Behave
Proper trap placement is everything, and it starts with knowing your opponent. First, forget about poison baits. Moles are insectivores, meaning their diet consists of earthworms, grubs, and other insects, so they have no interest in grain-based poisons. Second, you need to find their main travel tunnels. Moles create shallow, winding feeding tunnels and deeper, straighter “highways.” You want to set your trap in a highway. To find an active one, simply flatten a section of a raised tunnel with your foot. If the mole pushes the dirt back up within 24 hours, you’ve found a live one. This is the perfect spot to learn how it works and set your trap.
The 8 Most Effective Mole Traps
Finding the right mole trap can feel like a shot in the dark, but it doesn’t have to be. The most effective traps work with a mole’s natural instincts, using their own tunnels against them. While some traps are easier to set than others, the best ones share a few key traits: durable construction, a sensitive trigger, and a design that ensures a quick, humane capture. Your choice will depend on your comfort level, soil type, and the specific mole activity in your yard.
To help you decide, I’ve put together a list of the top mole traps on the market. We’ll look at everything from classic scissor traps that have been trusted for generations to modern designs that offer hands-free setup. Each one has its own strengths, and understanding them will help you pick the perfect tool to reclaim your lawn. Whether you’re a seasoned gardener or a homeowner facing your first mole invasion, there’s a trap on this list that will get the job done.
1. Cinch Mole Trap (Scissor-Style)
The Cinch Mole Trap is a classic for a reason. Handmade in Oregon from galvanized steel, this trap is built to last a lifetime and is incredibly effective. Its scissor-jaw design is made to be placed directly inside a mole’s tunnel. When the mole travels through and pushes dirt against the trigger pan, the trap closes swiftly. This design has been proven so effective that it’s been ranked #1 in university studies. Because it’s set underground, it’s safe for pets and children once installed. If you’re looking for a durable, reliable, and proven solution, the Cinch Mole Trap is one of the best investments you can make for your yard.
2. Victor Out O’Sight Mole Trap
Another powerful scissor-style trap, the Victor Out O’Sight is a popular choice among homeowners and professionals. Like the Cinch Trap, it’s designed to be set in the main underground runway, making it discreet and safe. It features malleable iron jaws for superior strength and durability. Setting it requires compressing the springs and placing the trigger in the active tunnel. Many users appreciate its effectiveness, but it can require a bit of hand strength to set. According to turfgrass specialists at Kansas State University, proper placement in an active tunnel is the key to success with this type of trap.
3. Wire Tek 1001 EasySet Mole Eliminator Trap
If you’re looking for a trap that’s exceptionally easy to use, the Wire Tek EasySet is a fantastic option. This trap is designed to be set from above the ground, eliminating the need to dig large holes in your lawn. You simply identify an active tunnel, insert the closed jaws, and step on the setting lever until it latches. When a mole passes through, the trigger is activated, and the jaws close. Its simple setup makes it a favorite for beginners who might be intimidated by more traditional scissor traps. The design also provides a clear visual indicator when the trap has been sprung.
4. Nash Choker Loop Mole Trap
The Nash Choker Loop trap uses a different mechanism than scissor traps but is just as effective. This trap features a choker loop that cinches around the mole as it moves through the tunnel. To set it, you place the trap inside the tunnel and block the tunnel on either side. As the mole works to clear the blockage, it pushes through the loop, triggering the trap. This design is particularly effective because it uses the mole’s natural instinct to clear its path. It’s a simple, time-tested device that has been used by trappers for decades to successfully manage mole populations.
5. Tomcat Mole Trap
The Tomcat Mole Trap is designed with safety and ease of use in mind. It’s a heavy-duty, professional-grade trap that features a hands-free setting mechanism. You activate the trap by stepping on a pedal, which makes it much safer to set than traditional traps that require hand strength. Its enclosed design also keeps the working parts away from children and pets. When the trap is triggered, the yellow pedal pops up, giving you a clear signal that you’ve caught a mole. This trap is often praised in product reviews for its powerful spring and user-friendly approach, making it a solid choice for homeowners.
6. GopherHawk Trapping Set
Though its name suggests it’s for gophers, the GopherHawk is also highly effective for trapping moles. What makes this trap unique is its all-in-one design that allows you to probe for tunnels, set the trap, and retrieve the mole without ever touching the ground. You use the pointed end to find an active tunnel, push the trap into the ground, and it sets itself. A yellow line on the handle disappears when the trap is sprung, providing an easy visual cue from a distance. This no-dig, no-mess system is perfect for anyone who wants a clean and straightforward trapping experience.
7. Aspectek Yard Sentinel Electronic Mole Repeller
For those who prefer a non-lethal approach, an electronic repeller like the Aspectek Yard Sentinel is a popular alternative. Instead of trapping, this device uses sonic pulses and vibrations to create an underground environment that moles find irritating, encouraging them to leave the area. You simply stake it into the ground, and it emits sounds at regular intervals. While many users report success, the effectiveness of sonic repellers can vary depending on soil conditions and the determination of your local moles. It’s a good first step if you want to avoid lethal methods.
8. Sweeney’s Mole and Gopher Trap
Sweeney’s offers a harpoon-style trap, which is one of the oldest and most powerful designs available. You place this trap directly over an active surface runway. When the mole moves through the tunnel below, it pushes up on the trigger, releasing a set of sharp spikes, or harpoons, that spear the pest. This trap is known for its quick action and effectiveness in areas with shallow tunnels. However, because of its exposed spikes, it requires careful handling and is not recommended for use in areas frequented by children or pets. It’s a powerful tool for serious mole problems.
How Different Types of Mole Traps Work
Choosing the right mole trap is a lot easier when you understand how each type works. Different designs are suited for different situations, soil types, and personal preferences. Some traps are set above ground, while others work entirely within the mole’s tunnel. Getting familiar with the basic mechanics of the most common trap styles will help you find the perfect tool for reclaiming your yard. Let’s look at how four popular types of mole traps get the job done.
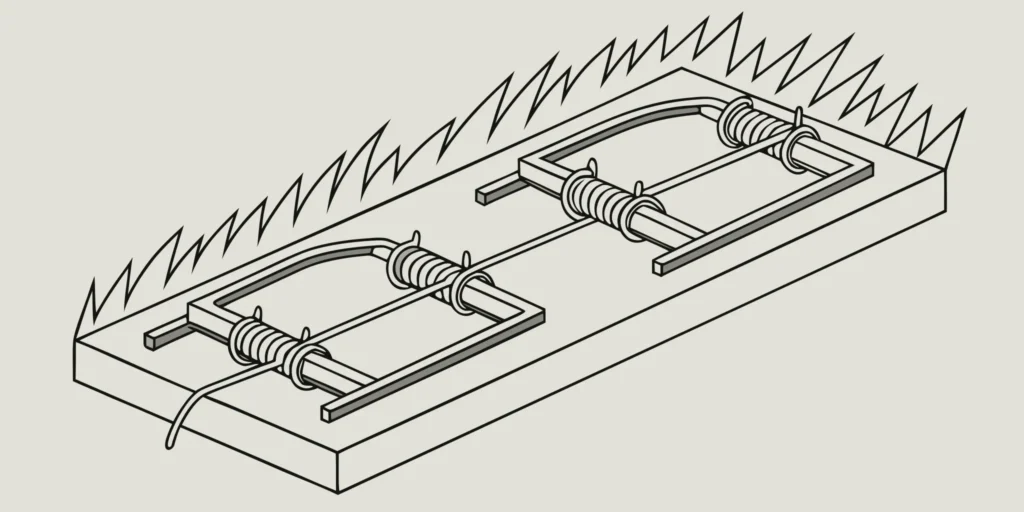
Scissor Traps: The Proven Standard
Scissor traps are one of the most popular and effective designs on the market for a reason. They work by placing two sets of powerful jaws directly into an active mole tunnel. When the mole moves through its runway to clear the dirt you used to block it, it pushes against a trigger pan. This action releases the spring-loaded mechanism, causing the jaws to snap shut for a quick and decisive catch. Many lawn care enthusiasts and professionals recommend having a few of these on hand. Their reliable design makes them a go-to solution for many homeowners dealing with persistent mole problems.
Harpoon Traps: For Quick Action
Harpoon traps are set above the ground, directly over an active tunnel. You press the trap’s legs into the ground on either side of the runway and set the trigger. When a mole travels through the tunnel below, its movement pushes up the trigger pan, releasing a set of sharp spikes, or “harpoons,” that spear the pest. These traps are generally easy to set and can be effective in shallow tunnels. However, their performance can be less reliable in soil that is very rocky, hard, or full of clay, as the spikes may not deploy properly.
Tunnel Traps: Safe and Precise
Often called choker loop traps, tunnel traps are considered one of the best mole trap designs by professionals. This type of trap is placed entirely inside the mole’s tunnel, making it one of the safest options for yards where children or pets play, since the trapping mechanism is completely underground. As the mole passes through the trap, it triggers a wire loop that quickly closes around it. Their precise placement and contained design lead to a very high success rate, making them a top choice for those who want an effective and discreet trapping method.
Electronic Traps: A Modern Approach
For those interested in a more modern solution, electronic traps offer a humane and hands-off method. These devices are typically placed inside the tunnel and use bait to attract the mole. Once the mole enters the trap, it completes an electrical circuit, which delivers a high-voltage shock for an instant kill. Most models have an indicator light to let you know when a catch has been made, so you don’t have to manually check the trap. This design provides a clean and efficient way to handle a mole problem without the mechanical components of traditional traps.
How to Choose the Right Mole Trap
With so many mole traps on the market, picking the right one can feel overwhelming. But a little know-how goes a long way. The most effective traps share a few key characteristics that set them apart from the flimsy or overly complicated options you might find at a big-box store. Focusing on durability, trigger sensitivity, safety, and weather resistance will help you invest in a tool that solves your mole problem for good, rather than causing more frustration. Let’s break down what you should look for.
Look for Durable Materials
A mole trap is an outdoor tool, and it needs to be tough enough to handle the elements. Investing in a professional-grade mole trap made from durable, galvanized steel ensures you have a tool that is both effective and can be used for years. Cheaper traps made from thin metal or plastic can bend, rust, or break after just one season, forcing you to buy replacements. A well-made steel trap provides the strength needed to work correctly every time. It’s a one-time purchase that will save you money and headaches in the long run.
Check for a Sensitive Trigger
Moles are powerful diggers, but they aren’t particularly heavy. A trap’s effectiveness hinges on a trigger mechanism that is sensitive enough to activate with minimal contact. The best traps are designed to activate with a simple bump from the mole as it moves through its tunnel clearing dirt. If the trigger is too stiff or requires a lot of force, a mole might push dirt into it without setting it off, or even dig around it entirely. A sensitive, reliable trigger is the single most important feature for ensuring a quick and successful catch.
Prioritize Safety and Ease of Use
Your mole trap should be effective against moles, not a hazard to you, your family, or your pets. Look for designs that are set underground within the mole’s tunnel. This placement keeps the working parts of the trap safely out of sight and away from curious pets or children playing in the yard. A straightforward setup is also key. Complicated traps are often set incorrectly, which reduces their effectiveness. An easy-to-use trap is one you can set confidently and correctly every time, leading to much better results.
Consider Weather Resistance
Your trap will be sitting in the dirt, exposed to rain, moisture, and changing temperatures. Rust and corrosion are the enemies of a functional mole trap, as they can cause the trigger mechanism to seize up. Traps made from galvanized steel offer excellent weather resistance. If you are using older traps, you can maintain them by cleaning them with a wire brush or steel wool to make sure they are working correctly. One important tip: never lubricate your traps. Oil and grease can hold on to dirt and have an unnatural scent that may deter moles from approaching the trap.
How to Find Active Mole Tunnels
Setting a mole trap is easy, but placing it in the right spot is what truly matters. A perfectly set trap in an abandoned tunnel won’t catch anything. Moles are constantly digging, but they only use a fraction of their tunnels regularly. Your goal is to find their current commute route. By learning to spot these active runways, you dramatically increase your chances of success and can solve your mole problem much faster. Here’s how to become a tunnel detective and find the perfect place for your trap.
Spot Main Runways vs. Feeding Tunnels
Think of a mole’s tunnel system like a city’s road network. There are small, winding side streets and main highways. The shallow, meandering tunnels you see just under the grass are feeding tunnels. Moles create these as they search for worms and grubs, and they might only use them once. The real prize is finding the main runways. These are deeper, straighter tunnels that moles use as their primary travel corridors. You’ll often find them running alongside sidewalks, driveways, fence lines, or your home’s foundation. Focusing your efforts on these “highways” ensures you place your trap right in the mole’s path.
Test for Activity With a Simple Poke Test
Once you’ve located what looks like a main runway, you need to confirm a mole is actually using it. The easiest way is with a simple poke test. Take your heel or a small stick and gently press down a one-inch section of the tunnel, creating a small blockage. Don’t completely stomp it flat, just enough to obstruct the path. Mark the spot with a small flag or stick so you can easily find it again. Check back in 12 to 24 hours. If the mole has pushed the dirt back up to reopen the tunnel, you’ve hit the jackpot. That’s an active tunnel and the perfect place to learn how it works.
Recognize Fresh Signs of Mole Damage
Fresh molehills, those classic volcano-shaped mounds of dirt, are another dead giveaway of recent activity. If you have a lot of damage and aren’t sure where to start, try this trick. On a clear day, walk around your yard and gently flatten every molehill and raised tunnel ridge with your foot or a rake. Make the ground as level as you can. Wait a day and then go back out to inspect your work. Any new molehills or tunnels that have been pushed back up are your active zones. This tells you exactly where the mole is currently working and where you should focus your trapping efforts with effective mole traps.
How to Set a Mole Trap for Maximum Success
Choosing a high-quality trap is half the battle; knowing how to set it correctly is the other half. A perfectly placed trap can mean the difference between frustration and a mole-free yard. The key is to think like a mole. You want to place the trap directly in their path without raising any alarms. This involves finding their main travel routes, setting the trap securely, and camouflaging your work. It might sound complicated, but it’s really about being methodical. When you understand a mole’s habits, you can use their own instincts against them. A well-set trap works with the mole’s natural tendency to clear obstructions in its tunnel. By following a few straightforward steps, you can dramatically increase your chances of catching these elusive pests on the first try. We’ll cover everything from pinpointing the busiest mole highways in your lawn to making sure your trap is perfectly hidden. Let’s walk through the process of setting a mole trap for the best possible results, turning your yard back into your own personal oasis. This isn’t just about getting rid of a pest; it’s about reclaiming your outdoor space with confidence.
Prepare the Tunnel for Trap Placement
First things first, you need to find an active tunnel. Moles create a network of tunnels, but they only use a fraction of them as main highways. To find an active one, gently press down a small section of a raised tunnel with your foot. Check back in a day or two. If the dirt has been pushed back up, you’ve found a busy runway. Once you’ve identified a good spot, use a small trowel to carefully excavate a section of the tunnel just large enough to fit your trap. Clear away any loose dirt, rocks, or roots that could interfere with the trap’s mechanism. A clean setup is essential for the trap to spring effectively.
Position and Secure the Trap Correctly
Proper placement is everything. Your goal is to set the trap so the mole has no choice but to pass through it. For a scissor-style trap, the jaws should straddle the tunnel, with the trigger mechanism sitting snugly in the path. Make sure the trap is aligned with the direction of the mole run. Wiggle it gently into the soil to ensure it’s stable and won’t tip over. An unstable trap is an ineffective one. The mole will simply dig around it. The entire process is designed to be simple, as you can see in our step-by-step guide.
Use Multiple Traps to Improve Your Odds
If you’re dealing with more than one mole or a large network of tunnels, one trap might not be enough. A great strategy is to place two traps in the same tunnel, facing opposite directions. Since you don’t know which way the mole will be traveling, this doubles your chances of a catch. Set them about a foot apart from each other in a long, straight section of the main runway. For larger infestations, consider setting traps in a few different active tunnels across your yard. This approach covers more ground and can help you get the problem under control much faster.
Cover the Trap to Avoid Detection
Moles are sensitive to changes in their environment, especially light and air drafts. After setting your trap, you need to cover the exposed area to make it look and feel like a natural part of the tunnel again. You can use a bucket, a large piece of plywood, or even a plastic pot to cover the trap and block all light. This simple step prevents the mole from getting suspicious and avoiding the area. It also has the added benefit of keeping the trap safe from curious pets or children and protecting it from rain or wind. For more tips, check out our frequently asked questions.
Common Mole Trapping Mistakes to Avoid
Even with the most effective trap in hand, a few common missteps can lead to an empty trap and a yard full of fresh molehills. Success often comes down to avoiding the simple mistakes that many people make when they’re just starting out. By understanding mole behavior and proper trap placement, you can make sure your efforts pay off. Let’s walk through the most frequent errors so you can get it right the first time and reclaim your lawn from these persistent pests.
Setting Traps in Inactive Tunnels
The single biggest mistake you can make is placing your trap in the wrong spot. Moles create a complex network of tunnels, but they only use a fraction of them regularly. Many of the visible surface runs are temporary feeding tunnels that they abandon quickly. Placing a trap in one of these is like waiting for a train on a track that’s no longer in service. The key is to find the main, active runways. You can test a tunnel by gently pressing down a small section with your heel. If the mole pushes the dirt back up within a day or two, you’ve found an active tunnel and the perfect place for your trap.
Using a Low-Quality or Weak Trap
It can be tempting to grab the cheapest trap off the shelf, but this often leads to frustration. Many mass-produced traps are made with flimsy materials and weak springs. A trap that isn’t strong enough might misfire or only injure the mole, making it wary of future traps. This is why quality construction matters so much. A well-made trap, like our durable Cinch mole traps built from galvanized steel, ensures a quick and humane dispatch. Investing in a high-quality tool not only works better but also lasts for years, saving you money and headaches in the long run.
Not Using Enough Traps for the Area
Moles are constantly on the move, and relying on a single trap to solve your problem is a gamble. To really improve your odds, you should use at least two traps per active runway. The best strategy is to place them back-to-back, with one facing each direction of the tunnel. This setup ensures you catch the mole no matter which way it’s traveling. For larger yards or more significant infestations, using four to six traps across different active tunnels is a good approach. More traps mean more opportunities to intercept a mole during its daily travels, helping you resolve the issue much faster.
Making Placement and Timing Errors
Beyond finding an active tunnel, the way you place the trap is critical. You need to set it so the trigger is sensitive and unobstructed by loose dirt or debris. Make sure the trap sits firmly in the tunnel without collapsing it. Another common error is giving up too soon. If a trap hasn’t caught anything in two or three days, don’t assume the moles are gone. It’s more likely that the tunnel has become inactive. Your best move is to pull the trap and find a new, active location. Patience and consistent checking are essential parts of a successful mole trapping strategy.
How to Check and Maintain Your Mole Traps
Setting your mole traps is a great first step, but the real secret to success lies in consistent monitoring and proper care. A well-maintained trap is an effective trap, and a little bit of attention goes a long way in keeping your yard mole-free. By creating a simple routine for checking and maintaining your traps, you ensure they work correctly for years to come. This process also helps you understand mole activity in your yard better, making you a more effective trapper over time. Think of it as protecting your investment; our traps are built to last a lifetime, and these simple habits will make sure they do.
Why You Should Check Traps Daily
Making a quick daily check on your traps is one of the most important things you can do. Regular checks are crucial for both success and the humane removal of moles. When you check every 24 hours, you can quickly deal with a catch and reset the trap to keep working for you. This habit also helps you gauge the effectiveness of your placement. If a trap hasn’t been sprung after 48 hours, it’s a good sign that the tunnel is no longer active. You can then confidently move the trap to a new, more active runway without wasting any more time.
How to Reset a Trap After a Catch
Once you’ve caught a mole, your job isn’t quite done. To continue clearing your yard, you’ll want to reset the trap. It’s often best to place it back in a main traveling run, as other moles are likely to use these same pathways. Before resetting, make sure the trap’s jaws are completely clear of dirt, roots, or other debris that could prevent them from closing properly. Align the trap carefully within the tunnel and backfill the opening with loose soil to block out all light. This makes the tunnel seem undisturbed to the next mole that comes along, increasing your chances of another catch with your mole traps.
Tips for Off-Season Maintenance and Storage
When mole season winds down, take a few minutes to prepare your traps for storage. If you’re using older traps, give them a good cleaning with a wire brush or steel wool to remove any rust or caked-on dirt. This ensures the mechanism stays sensitive and effective. One important tip: never lubricate your traps. Oil and grease can hold human scents and may even deter moles. For brand-new traps, it’s a good idea to leave them outside for a week or two to “weather” and lose any manufacturing smells before their first use. Proper care ensures your traps are always ready for action when you need them most. You can find more care information on our FAQs page.
Where to Buy Effective Mole Traps
Once you’ve decided which type of mole trap is right for your yard, the next step is figuring out where to buy it. You have a few options, and each comes with its own set of pros and cons. Making a smart purchase isn’t just about finding the lowest price; it’s about getting a reliable tool that will actually solve your mole problem for good. Let’s walk through the best places to find a trap that works.
Online Retailers vs. Local Hardware Stores
Big-box online retailers and your local hardware store both offer convenience, but for different reasons. Online stores typically have a much wider selection, allowing you to compare various brands and models from your couch. You can read reviews and see what other people have experienced. The downside is that you can’t physically inspect the trap before buying. A local hardware store, on the other hand, lets you get a feel for the trap’s construction and trigger mechanism. You can also get immediate advice from staff, but your choices will likely be limited to just a few popular models.
Buying Directly From the Manufacturer
For a professional-grade tool, your best bet is often to buy directly from the people who make it. This approach ensures you’re getting an authentic, high-quality product, not a flimsy imitation. Manufacturers also provide the best customer support because they know their products inside and out. When you shop for mole traps from a dedicated company, you’re investing in a solution that was specifically designed to be effective and durable. You also get access to their full range of products and accessories, which might not be available elsewhere.
How to Find the Best Deals and Sales
Everyone loves a good deal, but it’s important to think about long-term value. A cheap trap that breaks after one season isn’t a bargain. Instead of just looking for the lowest price, look for quality that lasts. Keep an eye out for seasonal sales, especially in the spring and fall when mole activity is high. Signing up for a company’s newsletter can also alert you to special promotions. Remember, investing in a well-made trap made from durable galvanized steel means you won’t have to buy another one next year, saving you money over time.
Why You Should Compare Prices
Comparing prices is about more than just finding the cheapest option; it’s about comparing value. When you look at different traps, check what you’re getting for your money. Does the trap come with a warranty? Is it made from weather-resistant materials? Is it easy to set safely? A slightly more expensive trap might offer a lifetime guarantee and a proven track record of success, making it a much smarter purchase. Taking a moment to understand the key features of an effective trap will help you make a confident and informed decision.
Related Articles
- Easy Mole Trap 101: The Ultimate 2026 Guide
- Mole Trap | Cinch Traps | The Best Mole & Gopher TrapHoliday Banner
- How to Set a Scissor Claw Mole Trap in 5 Steps
- 7 Things to Know Before You Buy Mole Trap Online
- The Best Way to Catch a Mole: A Step-by-Step Guide
Frequently Asked Questions
Why isn’t my trap catching anything? If your trap remains empty after a couple of days, the most likely reason is its location. Moles dig extensive networks but only use certain tunnels as main travel routes. You probably placed the trap in a temporary feeding run. Try using the poke test on a different, straighter tunnel to confirm it’s active before moving your trap there. Also, ensure the trap is set firmly and the trigger mechanism is free of any dirt or rocks that could prevent it from springing correctly.
Are underground traps safe to use around pets and children? Yes, traps designed to be set inside the mole’s tunnel, like scissor or choker loop styles, are among the safest options available. Because the entire mechanism is placed underground and then covered, it is out of sight and reach. This design minimizes risk to curious pets and playing children, allowing you to handle a mole problem without creating a hazard in your yard.
Do I need to use bait with a mole trap? No, you do not need to use bait. In fact, it won’t help. Moles are insectivores, which means their diet consists almost entirely of earthworms, grubs, and other insects living in the soil. They are not attracted to the grain-based poisons or baits used for rodents. Effective mole traps work by interrupting the mole’s tunnel, relying on the mole’s instinct to clear the path to trigger the trap.
How many traps do I really need for my yard? While one trap can certainly work, using multiple traps significantly increases your chances of success. A good rule of thumb is to use at least two traps in each active runway, with one facing each direction to catch the mole no matter which way it’s traveling. For a typical suburban yard with a noticeable mole problem, having four to six traps set in different active areas will help you get the situation under control much more quickly.
What’s the difference between a mole and a gopher mound? It’s easy to confuse the two, but they leave different clues. Moles create volcano-shaped, conical mounds because they push dirt straight up and out of the tunnel. Their surface tunnels also leave raised ridges in the lawn that look like veins. Gophers, on the other hand, create fan-shaped or crescent-shaped mounds with a visible dirt plug off to one side, as they push dirt out of the tunnel at an angle. Correctly identifying your pest ensures you use the right kind of trap.
