Taking back your yard from tunneling pests is one of the most satisfying DIY victories. It’s about more than just getting rid of mounds; it’s about restoring order and protecting the outdoor space you’ve worked so hard to create. A high-quality trap is the best tool for the job, and learning how to set a mole trap spring-loaded is a skill that will serve you for years to come. This guide is here to empower you with the knowledge to handle the problem confidently and effectively. We’ll break down the process into simple, actionable steps so you can stop feeling frustrated and start seeing results.
Key Takeaways
- Target active tunnels for success: Your trap must be in a main runway a mole uses daily. Test a tunnel by poking a small hole; if it’s repaired within 24 hours, you’ve found the perfect spot.
- A proper setup is non-negotiable: Place the trap firmly in a cleared tunnel so it doesn’t wobble. Always wear gloves to protect your hands and prevent your human scent from deterring the mole.
- Be patient, but ready to adapt: Check your traps daily for the quickest results. If a trap remains untouched for two days, it’s time to relocate it to a different active tunnel.
How Do Spring-Loaded Mole Traps Work?
If you’ve ever wondered how a simple metal device can so effectively solve a persistent mole problem, you’re in the right place. The genius of a spring-loaded trap lies in its straightforward design, which uses a mole’s natural behavior to your advantage. Unlike baits or repellents that moles might ignore, a well-placed trap works with their instinct to clear and travel through their tunnels.
These traps are a time-tested solution because they are built on a simple, powerful principle: intercepting the mole directly in its path. When you understand the mechanics, you can see why this method has remained a favorite for gardeners and property owners for decades. Let’s break down exactly how they function and what makes them so reliable.
The Mechanics Behind the Trap
Think of a spring-loaded trap as a carefully placed gatekeeper in a mole’s underground highway. The entire design is meant to be set inside an active mole tunnel, the pathways they use daily to search for food. When a mole travels through its tunnel, it naturally pushes dirt and debris to clear the way. The trap uses this instinct to trigger its mechanism. As the mole moves through and pushes against the trigger plate, it releases the powerful, coiled spring. This action snaps the trap’s jaws shut instantly. It’s a purely mechanical process, which is what makes it so dependable. You can see a full visual guide of how it works on our site.
Why They Are So Effective
The proof of a trap’s worth is in the results, and spring-loaded traps have a long history of success. Many people report catching a mole shortly after setting one for the first time. Their high success rate comes from the direct-approach strategy. You aren’t trying to lure a mole with bait or scare it away with a strange scent. Instead, you are placing a trap directly in the path it is guaranteed to take. This removes all the guesswork. Because the trap is triggered by the mole’s natural movement, the capture is quick and decisive. This targeted approach is what makes our durable, American-made mole traps the go-to solution for getting your yard back.
What You’ll Need to Set Your Trap
Before you head out to the yard, let’s get your gear in order. Having the right tools on hand makes the process much smoother and safer. The good news is, you don’t need a professional-grade arsenal to get the job done. Just a few key items will set you up for success in reclaiming your lawn from these tunneling pests. We’ll cover the basic toolkit you’ll need to find the right spot and set your trap, plus the simple safety gear that will protect you during the process. Getting prepared now means you can act quickly and confidently when you find that perfect, active mole run.
Your Trap-Setting Toolkit
First and foremost, you need a reliable trap. Spring-loaded traps are the most effective tools available because they work quickly and humanely when set correctly. You’ll also want a small garden trowel or shovel to carefully dig into the mole tunnel without causing it to collapse. A simple probe, like a long screwdriver or a dedicated soil probe, is also incredibly helpful for locating the main tunnels beneath the surface. With these items, you have everything you need to properly place one of our mole traps in an active run, ensuring the mole will trigger it on its next pass.
Essential Safety Gear
Safety is simple but non-negotiable. Always wear a pair of sturdy garden gloves. This protects your hands from the powerful spring mechanism when you’re setting the trap. Gloves also serve another purpose: they help mask your human scent on the trap, which can make moles wary and avoid the area. Beyond gloves, it’s a good habit to regularly inspect your trap. Before each use, give it a quick look for any signs of wear or damage. A well-maintained tool is a safe and effective tool. Our durable galvanized steel traps are built to last, but a little care goes a long way.
How to Find an Active Mole Tunnel
Setting a mole trap is all about location. Placing your trap in a tunnel that a mole abandoned weeks ago won’t get you very far. The secret to success is finding an active, frequently used tunnel. Moles are creatures of habit, and by identifying their main routes, you can place your trap right in their path. Think of it as finding the busiest highway in their underground network. Let’s walk through how to pinpoint the perfect spot in your yard.
Look for Fresh Signs of Activity
Your first step is to survey your lawn for the freshest signs of mole activity. Look for the classic volcano-shaped mounds of dirt. Fresh mounds will have darker, moister soil compared to older, sun-baked ones. Gently press your foot on the ground around these mounds and along any visible ridges. If the ground feels soft, spongy, or hollow, you’re likely standing on top of a tunnel. You might also notice areas where the grass looks disturbed or flattened. These are all clues that a mole has been busy right under the surface, making it a great place to start your investigation.
Test a Tunnel to Confirm It’s Active
Once you’ve found what looks like a promising tunnel, it’s time to confirm a mole is actually using it. This simple test removes all the guesswork. Take a small stick or your finger and gently poke a hole in the top of a surface ridge, collapsing a small section. Mark the spot with a flag or a stick so you can find it again easily. Now, you wait. Check back on the spot within 12 to 24 hours. If the hole has been plugged back up, you’ve hit the jackpot. This repair job is a clear sign that a mole is actively maintaining that tunnel, making it the ideal location for one of your mole traps.
Know the Difference Between Tunnel Types
Moles create two different kinds of tunnels, and knowing which is which is key. First, there are the shallow, winding feeding tunnels that are just below the surface. These are the ones that create those ugly raised ridges in your lawn. Moles often use these tunnels only once while searching for food. The second type are the main runways. These are deeper, straighter tunnels that moles use as their primary travel corridors to get from their dens to feeding areas. You want to place your trap in these main runways. They are often located along a permanent structure like a driveway, a foundation, or a fence line. You can find more details about mole behavior in our FAQs.
A Step-by-Step Guide to Setting Your Mole Trap
Setting your trap correctly is the most important part of getting rid of moles for good. While it might seem intimidating at first, the process is straightforward once you get the hang of it. Our mole traps are designed to be simple and effective, and following these four steps will help ensure a successful catch every time. Let’s walk through the process together, from finding the right spot to securing the trap.
Step 1: Prepare the Tunnel
First things first, you need to prepare the mole’s tunnel. Using a small garden trowel or a hori hori knife, carefully cut a small section of sod directly over the active runway you identified. Make the opening just large enough to fit the trap. The goal is to interrupt the tunnel without completely destroying it. Once you have an opening, clear out any loose dirt that has fallen inside. A clean tunnel allows the trap’s mechanism to work without getting clogged, which is crucial for a quick and effective catch.
Step 2: Position the Trap Correctly
Now it’s time to place the trap. Lower the trap into the opening with the jaws positioned down in the tunnel. The trap should straddle the runway so the mole has to pass directly through the jaws. Make sure the bottom of the trap is resting firmly on the floor of the tunnel. A wobbly or unstable trap can make a mole suspicious, causing it to back away and dig around it. Proper placement ensures the mole continues on its path as usual, right into the trap.
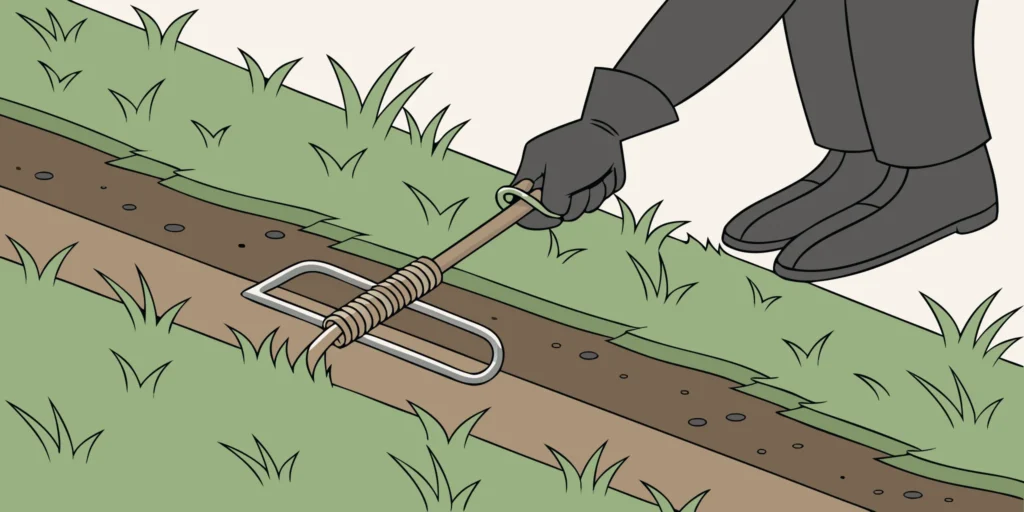
Step 3: Engage the Spring Mechanism Safely
With the trap in place, it’s time to set it. This step requires firm, steady pressure, so be sure to have a good grip. Squeeze the large spring loop toward the jaws until you can hook the trigger wire over the trigger pan. Your trap is now set and active. This process is designed to be done safely, but it’s always best to handle the trap with care. For a clear visual guide, you can watch the short video on our How It Works page.
Step 4: Cover and Secure the Trap
The final step is to cover your set. Moles dislike light in their tunnels, so you need to block the opening you created. You can use the piece of sod you originally cut out, a clod of dirt, or even an upside-down bucket. The key is to block all light without letting dirt fall into the tunnel and interfere with the trap. The handles of the trap will remain visible above ground, giving you an easy way to check if the trap has been sprung from a distance.
How to Set Mole Traps Safely
Using a mole trap is an effective way to reclaim your yard, but safety should always come first. Cinch Traps are powerful tools, and handling them with care and respect is essential for getting the job done right. Your safety, and that of your family and pets, is the top priority. Following a few straightforward practices will ensure your mole-trapping experience is successful and accident-free from start to finish.
Protect Yourself During Setup
When you’re ready to set your trap, it’s important to be mindful. Spring-loaded traps are powerful by design, so always treat them with caution. The most important rule is to keep your hands and fingers clear of the trap’s internal mechanism once you engage the spring. We recommend wearing sturdy gardening gloves, which not only keep your hands clean but also serve as a physical reminder to handle the trap carefully. Always give the trap your full attention during the setup process. This simple habit prevents accidents and ensures you can set the trap correctly every time.
Keep Children and Pets Away
Curious kids and pets can find their way into just about anything, so creating a safe zone around your mole traps is essential. Before placing a trap, make sure children and pets are safely inside or in a separate, secured area of your yard. Once a trap is set, it can be dangerous if triggered accidentally. If possible, place traps in parts of the yard that are less frequented. For extra precaution, you can mark the location with a small flag or a simple, temporary barrier. This helps prevent anyone from accidentally stumbling upon the trap.
Handle Set Traps with Care
Once your traps are in the ground, your safety routine isn’t over. Check on them regularly, and always approach a set trap with the same care you used when you first placed it. Before handling, visually inspect the trap for any signs of damage or wear that could affect its performance. Proper maintenance is key to both effectiveness and safety. A well-cared-for trap will function predictably and last for years. Our mole traps are handmade from galvanized steel for durability, but a quick check ensures everything is in perfect working order.
Common Trapping Mistakes to Avoid
Setting a mole trap can feel straightforward, but a few small missteps can lead to an empty trap and a yard full of new tunnels. Don’t worry, these are easy fixes. By avoiding these common mistakes, you’ll drastically improve your chances of success and reclaim your lawn from these burrowing pests.
Placing the Trap in the Wrong Spot
It’s tempting to place a trap near the first molehill you see, but location is everything. A trap set in an old, abandoned tunnel won’t catch anything. You need to find an active runway. Look for fresh, mounded piles of dirt or feel for soft, spongy spots in your lawn. To be certain a tunnel is in use, try this simple test: gently poke a small hole in the top of a tunnel. If the hole is plugged back up within a day or two, you’ve found an active path. Placing your trap here ensures a mole is likely to pass through. For a visual guide on tunnel identification, see how it works in action.
Setting the Trap Incorrectly
An improperly set trap is one of the biggest reasons for trapping failure. Each trap has a specific mechanism, and getting it right is key to a quick, effective catch. When the trap is engaged, the trigger should be sensitive enough to spring when a mole moves through, but secure enough that it doesn’t go off while you’re placing it. Make sure the trap is positioned squarely in the middle of the tunnel, forcing the mole to cross over the trigger plate or through the jaws. Using reliable, easy-to-set mole traps can make this process much simpler and safer, removing a lot of the guesswork.
Forgetting to Prepare the Tunnel
You’ve found an active tunnel and set the trap perfectly, but there’s one more crucial step: preparing the tunnel itself. A mole’s instinct is to clear any blockages in its path. You can use this to your advantage. After placing the trap, make sure the tunnel is clear of loose dirt or debris that could jam the mechanism. Some trappers even create a small, deliberate obstruction by pressing down on the tunnel floor right under the trigger. This encourages the mole to push through with more force, ensuring a solid trigger. Properly preparing the tunnel gives your trap the best possible chance to function flawlessly. If you run into issues, our FAQs page has plenty of troubleshooting tips.
How to Monitor and Maintain Your Trap
Setting your trap correctly is the first major step, but what you do next is just as important for getting rid of moles for good. Consistent monitoring and simple maintenance are what turn a good trap into a great one. A well-cared-for trap is a reliable tool that will keep your yard clear season after season. Since Cinch Traps are handmade from durable galvanized steel and backed by a lifetime warranty, a little bit of care goes a long way. Taking a few minutes to check and clean your traps ensures they are always ready to perform at their best, protecting your investment and your lawn.
How Often to Check Your Traps
Moles don’t keep a 9-to-5 schedule; they can be active at any time of day or night. That’s why it’s important to check your traps at least once a day. You can make it part of your daily routine, like when you’re watering plants in the morning or taking the dog out in the evening. A quick daily check helps you solve your mole problem much faster. The sooner you know you’ve made a catch, the sooner you can remove the mole and reset the trap to continue clearing your yard. Staying on top of it is the most efficient way to get results and reclaim your lawn from these tunneling pests.
Signs of a Successful Catch
You’ll know you’ve caught a mole when the trap has been sprung. With Cinch Traps, the setting levers will be released and standing straight up, providing a clear visual signal that it’s been triggered. This design is incredibly helpful because it allows you to check the trap’s status from a distance, so you don’t have to disturb the area every time. If you see the trap has been triggered, you can approach to confirm the catch. The simple mechanics are what make these traps so dependable. Once you’ve confirmed a catch, you can safely remove the mole and reset the trap in the same active tunnel.
Clean and Store Your Trap Properly
A little upkeep goes a long way in ensuring your trap works perfectly for a lifetime. After each catch, take a moment to clean off any dirt, mud, or debris that could get in the way of the trigger mechanism. Our mole traps are made from galvanized steel to resist rust, but it’s still a good practice to wipe them down and make sure all parts move freely. When you’re done trapping for the season, give your traps a final cleaning and store them somewhere dry, like a garage or shed. This simple maintenance routine will keep your traps in top working condition, ready for whenever you need them next.
Trap Not Working? How to Troubleshoot
It can be frustrating to set a trap perfectly, only to come back and find it untouched. Don’t give up just yet. Sometimes, a few small adjustments are all it takes to outsmart these clever critters. If your trap isn’t getting results, it’s usually due to one of three things: location, technique, or timing. Let’s walk through some simple troubleshooting steps to figure out what’s going on and get your yard back on track.
Know When It’s Time to Relocate Your Trap
Patience is important, but you also need to know when to change your strategy. If a trap hasn’t been triggered within 24 to 48 hours, it’s time to move it. Moles can be unpredictable and might abandon a tunnel for a new one. Leaving a trap in an inactive run won’t get you anywhere. The key is to find a tunnel that’s currently in use. If you’re not sure how to spot one, a quick refresher on how it works can help you identify the main highways moles use to get around your yard. Relocating your trap to a fresh, active tunnel significantly increases your chances of a quick catch.
Adjust Your Technique for Better Results
Sometimes the issue isn’t the location, but the setup itself. A common mistake is not fitting the trap correctly within the tunnel. If the trap is too loose, the mole can push past it without setting it off. If it’s too tight or blocked by debris, the mole will simply dig around it. Make sure the trap sits snugly and the tunnel is clear of rocks, roots, or clumps of dirt. It’s also a good idea to inspect your trap. Our mole traps are built from galvanized steel to last a lifetime, but it never hurts to ensure the mechanism is clean and moving freely before you set it.
Consider Seasonal Trapping Differences
Mole behavior changes throughout the year, and this can affect your trapping success. While they can be active at any time of day, your best bet is to set traps in their main traveling runs, not the shallow feeding tunnels that branch off. Moles use these deeper tunnels more consistently. During extreme heat or cold, they tend to dig deeper into the soil, making surface tunnels less active. Spring and fall are often the best times for trapping as moles are most active near the surface. Understanding these patterns can make a huge difference. For more tips on mole behavior, our FAQs page is a great resource.
Achieve Long-Term Mole Control
Getting rid of moles is one thing, but keeping them away for good requires a consistent strategy. Effective, long-term control isn’t about a single victory; it’s about establishing a reliable system that protects your yard season after season. By using the right tools and maintaining them properly, you can turn a frustrating pest problem into a manageable task. The key is to combine proven trapping methods with simple upkeep to ensure your equipment is always ready to perform when you need it most.
Best Practices for Consistent Results
When it comes to getting consistent results, nothing beats a high-quality, spring-loaded trap. These are widely considered the most effective tools because they work with a mole’s natural behavior. Instead of relying on baits or repellents, these traps are placed directly inside an active tunnel. This placement is critical because it ensures the mole will run right into the trigger mechanism during its daily travels. To get the best outcome, always confirm you’re setting your mole traps in a main runway, not a secondary feeding tunnel. This strategic approach is the foundation of successful, repeatable mole control.
How to Make Your Trap Last
A great trap is an investment, and a little care will ensure it lasts a lifetime. Cinch Traps are handmade from galvanized steel for incredible durability, but simple maintenance will keep them in perfect working order. After each use, clean off any dirt or debris. Periodically inspect the trap for any signs of wear and make sure the trigger and spring mechanisms are moving freely. Storing your traps in a dry place like a shed or garage during the off-season will prevent unnecessary exposure to the elements. This simple routine of cleaning, inspecting, and storing properly keeps your traps effective and ready for action. For more detailed tips, you can always check our FAQs.
Related Articles
- How it Works | Cinch Traps | The Best Mole & Gopher Trap
- 10 Best Mole Trap Reviews: Tested & Ranked
- Easy Mole Trap 101: The Ultimate 2026 Guide
- The Best Way to Catch a Mole: A Step-by-Step Guide
- 4 Best Mole Traps for Lawns (Tested & Reviewed)
Frequently Asked Questions
How many traps should I use in my yard? The number of traps you need really depends on the size of your mole problem. For a small yard with just a few tunnels, starting with two or three traps is a great approach. This allows you to cover the most active runways and increase your chances of a quick catch. If you have a larger property or a more widespread infestation, you might need more traps to effectively manage all the active areas at once.
What should I do after I’ve caught a mole? Once you’ve made a successful catch, you can remove the mole from the trap. It’s a good idea to check local regulations for proper disposal. After that, your work isn’t done. Moles are often solitary, but another one might move in to claim the empty tunnel system. The best strategy is to reset the trap in the same active runway to ensure you’ve cleared the area completely.
Will the trap harm my pets or other wildlife? Because these traps are set underground within a mole’s tunnel system, the risk to pets and most other wildlife is very low. The trap is designed to be triggered by a mole clearing its path from inside the tunnel. However, it’s always a smart practice to keep curious pets and children away from the area where you’ve set a trap, just as a general precaution.
Why is a trap a better option than baits or repellents? Traps offer a direct and definitive solution that baits and repellents often can’t match. Moles are insectivores, so they may ignore poison baits that don’t appeal to their natural diet. Repellents can be inconsistent and may just encourage the mole to move to a different part of your yard. A well-placed trap works with the mole’s natural instinct to travel through its tunnels, providing a quick and reliable method of removal.
How can I tell if I have moles or gophers? This is a great question, as the mounds they create can look similar. The key difference is in the shape and location of the dirt pile. Moles create conical, volcano-shaped mounds, and their tunnels create raised ridges in the lawn. Gophers, on the other hand, create fan-shaped or crescent-shaped mounds with a visible plug on one side where they’ve sealed the tunnel entrance.
