Gopher traps are incredibly effective, but let’s be honest, their powerful springs can be a little intimidating. If you’ve ever hesitated to set a trap, worried about your fingers, you’re not alone. That’s where a setting tool comes in. This simple device is your key to handling traps with total confidence and safety. It gives you the leverage you need to open the trap’s strong jaws easily, so you can focus on perfect placement instead of wrestling with the mechanism. This guide is designed to walk you through everything you need to know, starting with the fundamentals of how to use gopher trap setting tool for a perfect, secure set every single time.
Key Takeaways
- Pinpoint the perfect location: Your success starts with finding an active main runway, not just any gopher mound. Use a probe to locate the tunnel between fresh mounds of dirt and place two traps inside facing opposite directions for the best results.
- Prioritize safety and a sensitive set: Use a setting tool to safely handle powerful traps and protect your hands. Once placed, ensure the trap has a hair-trigger sensitivity so it springs with the slightest touch from a gopher.
- Develop a consistent routine: Check your traps at least twice a day to humanely manage your catch and reset traps quickly. Always wear gloves to mask your scent and cover tunnel openings to keep pets and children safe.
What’s a Gopher Trap Setting Tool?
If you’re new to trapping, you might wonder what a gopher trap setting tool is and if you really need one. Think of it as your essential partner for safely and correctly placing gopher traps. These tools are specifically designed to help you handle and set powerful traps without putting your fingers at risk. Usually made of durable steel, they give you the leverage and control needed to open the trap’s jaws and position it perfectly inside a gopher tunnel. Using a setting tool not only prevents the trap from accidentally snapping on your hands but also helps you achieve the perfect placement. This ensures the trap is sensitive enough to activate when a gopher passes through, but not so sensitive that it misfires. It takes the guesswork out of setting traps and gives you confidence that the job is done right. It’s all about making the process safer, easier, and much more successful, turning a tricky task into a straightforward one.
How Does It Work?
A setting tool works by giving you a secure way to compress the trap’s spring mechanism. But before you can use it, you need to do a little detective work. The first step is always to find an active gopher tunnel system. According to our gopher trapping instructions, you should “place one gopher trap into each of the branching tunnels, making sure they face in opposite directions.” This placement covers both entry and exit points. Once you’ve located the right spot, the setting tool helps you open the trap and carefully place it. A properly set trap is the key to success; it “should be sensitive enough to spring with just a light nudge from the gopher as it moves through its tunnel.”
Why Use One?
The main reason to use a setting tool is for safety and efficiency. It provides a crucial barrier between your hands and the trap’s powerful mechanism, which is especially helpful for anyone with limited hand strength. While some traps are designed to be easier to set, a tool makes almost any trap more accessible and secure to handle. Beyond personal safety, using the right equipment simply gets better results. Studies have shown that trapping is a highly effective tool for managing gopher populations, and any method that improves your success rate is a win. A setting tool helps you place the trap correctly every time, increasing your chances of catching the pest and protecting your yard.
Finding the Right Trap for Your Setting Tool
A gopher trap setting tool is designed to make your life easier and safer, but it only works if it’s paired with the right trap. Not all traps are created equal, and some are simply not built to be used with a setting tool. Forcing a tool onto an incompatible trap can damage the trap, the tool, or even cause it to misfire, which is a safety risk you don’t want to take.
Choosing the right trap is the first step to successfully solving your gopher problem. When you’re using a setting tool, you need a trap that is designed for that kind of mechanical assistance. This usually means looking for specific styles, like cinch or scissor traps, that have open designs allowing the tool to grip and spread the jaws safely. Let’s break down what to look for to ensure you have a perfect match.
Cinch Traps: A Perfect Match
When it comes to compatibility with setting tools, our gopher traps are a natural fit. Cinch traps, also known as scissor traps, are highly effective and reliable, which is why they’re a top choice for gardeners and professionals alike. Their design allows a setting tool to get a secure grip, giving you the leverage needed to open the trap without putting your fingers at risk. This makes the entire process quicker, safer, and much less intimidating, especially if you’re setting multiple traps across your property.
For a complete setup that includes gloves, flags, a tunnel clearing tool, and maintenance spray alongside three durable traps, check out the Cinch Traps deluxe gopher kit.
Compatibility with Other Trap Styles
While Cinch Traps are ideal, setting tools can sometimes work with other trap styles, provided they have a similar mechanism. The key is that the trap must be opened by spreading two arms or jaws apart. Traps like the Victor Easy Set, for example, often feature a design that can accommodate a setting tool. No matter which brand you use, the goal is to create a hair-trigger setup. A properly set trap should be sensitive enough to spring with just a light nudge from a gopher. Placing two traps in a tunnel, one facing each direction, doubles your chances of a quick catch.
Key Features of a Compatible Trap
So, what should you look for in a trap? First, prioritize durable construction. A trap made from galvanized steel will withstand the elements and the force of the setting tool without bending or breaking. Second, consider the trap’s tension. Some traps require significant hand strength to set, which is where a tool becomes essential. A well-designed trap will have a balance of strong tension for an effective catch and a mechanism that isn’t impossible to open. Look for a simple, reliable design that you can understand and handle with confidence.
How to Find Active Gopher Tunnels
Setting a gopher trap is straightforward, but your success hinges on placing it in the right spot. Gophers create an extensive network of tunnels, but they don’t use all of them regularly. Placing your trap in an old, abandoned tunnel won’t get you very far. Before you set your trap, you need to do a little detective work to find an active, main runway. This is the single most important step to quickly and effectively solving your gopher problem. Think of it as finding the gopher’s daily commute route.
Spot Fresh Gopher Mounds
The first clue you’re looking for is fresh dirt. Gophers push soil to the surface as they dig, creating crescent or fan-shaped mounds. Active tunnels will have mounds made of dark, moist soil. Older mounds will look dry, sun-baked, and may even have weeds starting to grow on them. Pay close attention to the openings; gophers usually plug the holes of their active tunnels with fresh soil to keep predators out. If you see a mound with a clear, fresh plug of dirt near the center, you’re on the right track. This is where you’ll want to start investigating to place your gopher traps.
Test Tunnels with a Probe
Once you’ve found a fresh mound, it’s time to locate the tunnel itself. The mound isn’t the entrance; it’s just the excavated dirt. The actual tunnel is usually a few inches away from the mound, running about 6 to 12 inches underground. You can use a gopher probe, a long screwdriver, or any sturdy metal rod to find it. Start probing the ground around the mound. You’ll feel resistance as you push the probe into the soil, but when you hit a tunnel, the probe will suddenly sink a couple of inches. This tells you you’ve found a hollow runway. You can find helpful accessories to make this process even easier.
Locate the Main Runways
Gophers have main runways, which are like their highways, and shorter, branching tunnels that lead to feeding areas. You want to place your trap in a main runway for the best results. To find one, look for a series of fresh mounds that appear in a relatively straight line. Probe the ground between two of these mounds to locate the connecting tunnel. Once you’ve found the main runway, carefully dig an opening just large enough to fit your trap. As our instructions suggest, it’s best to place two traps in the tunnel, one facing each direction. This ensures you’ll catch the gopher no matter which way it’s traveling.
Safety First: How to Handle Traps
Gopher traps are powerful tools, and that’s why they work so well. But their strength means you need to handle them with care and respect. Putting safety first protects you, your family, and your pets from any potential accidents. It also helps you become a more effective and confident trapper in the long run. Before you even think about setting a trap in a tunnel, it’s essential to get familiar with the proper handling procedures. Think of it like learning the rules of the road before you start driving; knowing what to do keeps everyone safe.
A few simple precautions can make all the difference. This means using the right gear, being mindful of your surroundings, and regularly checking on your equipment. These steps aren’t just about avoiding injury; they also ensure your traps function correctly and humanely, which is important to all of us. By building good safety habits from the start, you can focus on the real goal: reclaiming your yard from those destructive pests. We’ll walk through exactly what you need to do to handle your gopher traps safely and successfully every single time, so you can get back to enjoying your garden without worry.
Gear Up for Safety
Before you get to work, make sure you have the right gear. Always wear a sturdy pair of gloves when handling your traps. This not only protects your hands from the powerful mechanism but also prevents you from leaving your scent on the trap, which can make gophers wary. Take a moment to understand how your specific trap works. For Cinch Traps, you’ll want to confirm the trip pins are fully engaged for a successful set. A snug placement in the tunnel ensures the gopher makes direct contact. If you have limited hand strength, some traps are designed with a lower torque requirement, making them easier to set.
Protect Children and Pets
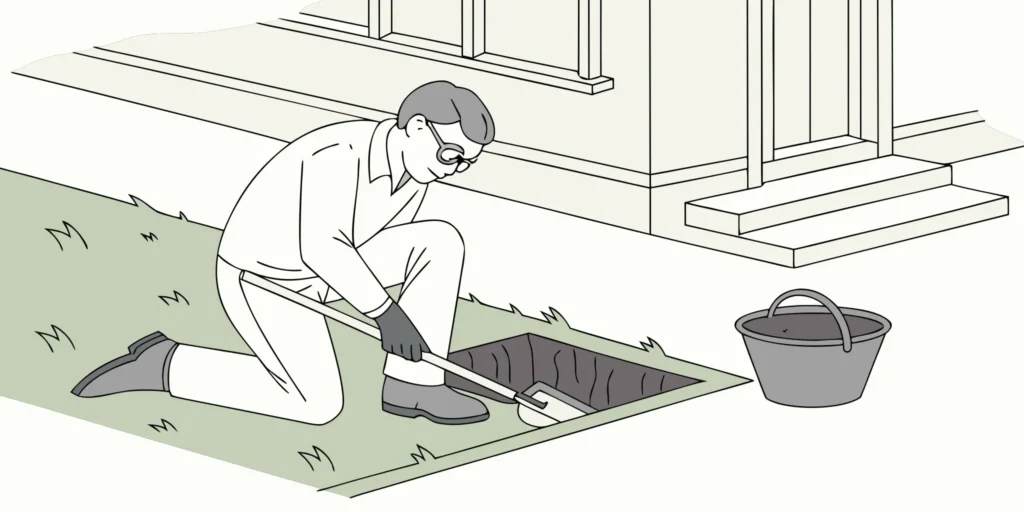
Your yard should be a safe space for everyone, so it’s crucial to be mindful of curious kids and pets. Never leave a set trap unattended in the open. A good rule of thumb is to only set the trap right when you are ready to place it in the ground. Once the trap is in the tunnel, you can add an extra layer of protection by covering the opening with a board or a bucket. This prevents anyone from accidentally stumbling upon it. Remember, these traps are powerful enough to cause serious injury, so taking this simple step is well worth the effort.
Inspect Your Traps and Tools
Part of using traps safely is making sure they are in good working order. Before each use, give your trap a quick inspection. Look for any bent parts, rust, or debris that might interfere with its function. A well-maintained trap is a reliable trap. Once your traps are set, you should plan to check them at least twice a day. This is important for humane trapping and allows you to remove any captured gophers quickly. If a trap hasn’t been triggered within 24 hours, it’s a good idea to move it to a new location. You can find more tips in our FAQs.
How to Use Your Gopher Trap Setting Tool, Step-by-Step
Alright, you’ve found an active tunnel and have your gear ready. Now for the main event: setting the trap. Using a setting tool makes this process much safer and simpler, taking the guesswork out of getting a perfect set every time. It gives you the leverage you need to open the strong springs without putting your fingers at risk. Follow these four steps carefully, and you’ll have your traps placed like a pro in no time.
Step 1: Prepare the Trap and Tool
First things first, make sure you have the right equipment. A well-made trap is the foundation of your success, so start with one of our reliable gopher traps. Before you begin, inspect your trap to ensure it’s clean and free of any debris that might interfere with the mechanism. Hold the trap securely in one hand and your setting tool in the other. Familiarize yourself with how the tool fits onto the trap’s levers. This initial prep ensures that when you’re ready to set the trap in the tunnel, the process will be smooth and efficient.
Step 2: Position the Trap in the Tunnel
Your success depends on placing traps in an active gopher tunnel. Once you’ve located the main runway, you’ll want to place two traps inside, one facing each direction to catch the gopher no matter which way it’s traveling. Carefully slide the unset trap into one of the openings as far as you can. The trap should fit snugly inside the tunnel. This precise placement is key because it ensures the gopher will have to pass directly through the trap. For a visual guide on finding the right spot, check out our detailed how-it-works page.
Step 3: Activate the Setting Mechanism
With the trap in position, it’s time to use your setting tool. Hook the tool onto the trap’s levers and squeeze the handles to open the jaws. This is where the tool does all the heavy lifting for you. Once the jaws are fully open, carefully engage the trigger mechanism with a stick or another tool. A properly set trap should be sensitive enough to spring with just a light nudge from the gopher as it moves through its tunnel. You should feel a distinct click or see the trigger catch, indicating the trap is now armed and ready.
Step 4: Confirm Placement and Sensitivity
Once the trap is set, slowly and carefully remove the setting tool. Always make sure the trip pins are fully engaged and that the trap is still placed snugly in the tunnel. This ensures the gopher makes direct contact. If you’re unsure about the sensitivity, you can gently test the trigger with a long, thin stick. If the trap springs easily, you’ve done it right. If you later find the trap sprung and the opening plugged with dirt, the gopher likely set it off while trying to backfill its tunnel, which is a good sign you’re in the right place. For more tips, our FAQs page has answers to common questions.
Common Gopher Trapping Mistakes to Avoid
Even the best gopher trap won’t work if it’s not used correctly. Gophers can be tricky, but avoiding a few common pitfalls will dramatically increase your success rate. Getting the placement, sensitivity, and timing right is key to quickly solving your gopher problem. Let’s walk through the most frequent mistakes so you can trap like a pro from your very first try and get your yard back.
Placing the Trap Incorrectly
Your success really depends on placing traps in an active gopher tunnel. Before you set your trap, you need to do a little detective work. Once you’ve located the main runway, your goal is to intercept the gopher as it moves through. The most effective method is to place two gopher traps inside the tunnel, with one facing in each direction. This setup ensures you’ll catch the gopher whichever way it’s traveling. Make sure the traps sit snugly on the tunnel floor so the gopher can’t just crawl over or under them.
Forgetting to Check Sensitivity
A properly set trap should be sensitive enough to spring with just a light nudge from the gopher. If the trigger requires too much force, a gopher might just push dirt against it, burying your trap without setting it off. After you place your trap, give the trigger mechanism a gentle poke to ensure it’s responsive. For Cinch Traps, this means checking that the trip pins are fully engaged and ready to go. This small step makes a huge difference and ensures the trap works exactly as it should when the gopher comes through.
Setting Traps in Old Tunnels
Gophers are prolific diggers, which means your yard is likely full of both active and abandoned tunnels. Placing a trap in an old, unused runway is a common mistake that leads to zero results. You can learn more about identifying fresh activity on our How It Works page. If you find a trap has been sprung and the opening is plugged with dirt, don’t get discouraged. This is actually a great sign. It means a gopher is actively using that tunnel and tried to block the new opening. Simply clear the dirt, reset the trap, and you’ll likely have your pest soon.
How Often Should You Check Your Gopher Traps?
Setting your gopher traps is just the first step. To get the best results, you need a consistent routine for checking them. Knowing when and what to look for makes the process efficient and effective, helping you reclaim your yard from these persistent pests. A little diligence goes a long way in successfully managing your gopher problem.
The Best Times to Check
Consistency is your best friend in gopher trapping. Plan to check your traps at least twice a day, once in the morning and again in the evening. This regular check-in is important for a few reasons. First, it’s the most humane approach, ensuring you can deal with a captured gopher quickly. Second, it lets you know if a trap has been triggered so you can reset it and get it working for you again without losing valuable time. Making it part of your daily routine, like when you get your mail or water your plants, helps you stay on top of the situation and clear out your gopher problem faster with the right gopher traps.
How to Know You’ve Caught a Gopher
You don’t need to pull the trap out of the ground to see if you’ve been successful. There are a few clear visual signs to look for. With a Cinch Trap, the most obvious indicator is that the jaws will be sprung shut. If you attached a wire or flag to your trap, you might see that it has been pulled down into the tunnel, which is another strong sign of activity. A quick glance is often all it takes to know if you need to take the next step. Understanding how it works will help you easily spot a triggered trap from a distance, saving you time and effort.
Safely Removing and Resetting Your Trap
Once you’ve confirmed a catch, it’s time to remove and reset the trap. Carefully pull the trap from the tunnel using the chain or wire you attached. Sometimes a gopher can pull the trap deeper into the runway, so you may need to dig a little to get it out. After removing the gopher, you can reset the trap for the next one. Before placing it back in the tunnel, always double-check that the trap is set correctly and the trigger mechanism is sensitive. A properly set trap placed snugly in an active tunnel is the key to catching more gophers and solving your pest problem for good.
Troubleshooting: Why Aren’t My Gopher Traps Working?
It’s frustrating to set a gopher trap perfectly, only to come back and find it empty or triggered with no gopher in sight. Don’t worry, this is a common hurdle, and usually, a small adjustment is all it takes to see results. If your traps aren’t catching anything, it’s time to play detective. The issue typically comes down to one of three things: where and how the trap is set, a particularly clever gopher, or the condition of your soil. Let’s walk through how to identify the problem and get your gopher control efforts back on track. By revisiting the basics, you can turn an empty trap into a successful catch.
Double-Check Your Placement and Sensitivity
Your success hinges on placing traps in an active gopher tunnel. Before setting your trap, you need to find the main runway where gophers travel frequently. Once you’ve located it, place one gopher trap into each of the branching tunnels, making sure they face opposite directions to catch gophers coming from either way. A properly set trap should be sensitive enough to spring with just a light nudge. Make sure the trip pins are fully engaged and that the trap sits snugly in the tunnel. This ensures the gopher makes direct contact as it moves through, rather than pushing dirt over it.
Outsmarting Trap-Shy Gophers
Sometimes, you’re dealing with a gopher that’s learned to be cautious. If you find your trap is sprung but the tunnel opening is plugged with dirt, the gopher likely sensed something was off and set it off while trying to block the tunnel. These trap-shy gophers require a bit more strategy. First, always wear gloves when handling your traps to minimize human scent. You can also try camouflaging the trap by lightly dusting it with soil from the tunnel. The goal is to make the trap seem like a natural part of the environment. Learning how it works and mastering the setup will help you outsmart even the wariest pests.
How Weather and Soil Affect Trapping
Environmental conditions can play a surprisingly large role in your trapping success. Extremely wet or dry soil can cause problems. Heavy, muddy soil can clog the trap’s mechanism, preventing it from springing correctly. On the other hand, if the soil is too dry and sandy, it might crumble around the trap, failing to hold it securely in place. The ideal time to set traps is when the ground is moist but not waterlogged, as this is when gophers are most active and the tunnels are most stable. If you’re consistently having trouble, check the soil conditions and consider waiting for them to improve.
Related Articles
- 4 Best Gopher Trap Setters for Easy Trapping
- How to Set a Cinch Gopher Trap: A 4-Step Guide
- Gopher Trap Setting Tool 101: The Ultimate Guide
- 5 Essential Gopher Trap Accessories
- The Ultimate Galvanized Steel Gopher Trap Guide
Frequently Asked Questions
Do I really need a setting tool to place my gopher traps? While it’s possible to set some traps by hand, a setting tool is highly recommended for both safety and effectiveness. It gives you the leverage to open the powerful trap jaws without putting your fingers in a dangerous spot. More importantly, it helps you achieve a perfectly sensitive set every time, which is critical for catching wary gophers. Think of it as the right tool for the job; it makes the process faster, safer, and much more successful.
My trap was triggered and filled with dirt, but there’s no gopher. What happened? Don’t get discouraged, this is actually a great sign. It means you’ve found an active tunnel and the gopher is nearby. Gophers are sensitive to changes in their environment, and when they detect the trap, their instinct is to plug the tunnel with dirt. In the process, they push soil into the trap and set it off. Simply clear the dirt, reset the trap in the exact same spot, and you’ll likely catch it on the next attempt.
Why is it so important to use two traps facing opposite directions? When you open up a gopher’s main runway, you have no way of knowing which direction the gopher will approach from to fix the breach. Placing two traps back-to-back, one facing each way, ensures you are covered no matter which direction it’s traveling. This simple step effectively doubles your chances of a quick catch and is the standard method used by professionals for a reason.
How long should I leave a trap in one spot before moving it? You should check your traps at least twice a day. If a trap hasn’t been triggered within 24 to 48 hours, it’s time to move it. A lack of activity usually means you’ve placed the trap in an inactive or secondary tunnel. Your time is better spent finding a fresher set of mounds and locating a main runway where the gopher is currently active.
What should I do with the gopher once I’ve caught it? The most important step is to check your traps regularly to ensure any captured animal is dealt with quickly. Once you have a catch, you’ll need to handle disposal. Regulations for this can vary by location, so it’s always a good idea to check with your local or state wildlife agency for specific guidelines in your area.
