To catch a mole, it helps to think like one. Understanding their behavior is the key to placing a trap where it will be most effective. Moles are sensitive creatures that follow specific patterns, and disrupting their environment in the wrong way will only send them digging a new route around your trap. While articles can describe their habits, a video makes it all click. Seeing how a professional identifies a main travel runway or prepares a tunnel helps you understand the “why” behind each step. A great how to set a mole trap video doesn’t just show you what to do; it shows you how to outsmart the mole.
Key Takeaways
- Focus on the mole’s main travel routes: Your success depends on placing traps in active, main tunnels, not the winding feeding runs. Find these by looking for straight paths that connect molehills, then confirm activity by flattening a small section to see if it’s repaired within 24 hours.
- A careful setup is crucial for success: How you place the trap is just as important as where you place it. Always wear gloves to mask your scent, set the trap firmly on the tunnel floor so it doesn’t move, and cover the area completely to block all light.
- Make checking your traps a daily habit: Consistent monitoring is the fastest way to solve your mole problem. Check your traps at least once a day to remove any catches promptly and reset any traps that have been sprung, which confirms you’ve found an active tunnel.
How to Tell if a Mole Tunnel is Active
Before you can set a trap, you need to play detective. Placing a trap in an old, abandoned tunnel is a waste of time. The key to success is finding the mole’s current “highway.” Moles are creatures of habit and will repeatedly use the same main tunnels to travel between their dens and feeding areas. By confirming a tunnel is active, you dramatically increase your chances of catching the culprit and reclaiming your yard. Let’s walk through a few simple ways to figure out exactly where you should focus your efforts.
Look for Fresh Soil Mounds and Ridges
The most obvious signs of a mole are the volcano-shaped mounds of dirt (molehills) and the raised ridges that snake across your lawn. Fresh mounds will have loose, dark, and often moist soil. Older mounds will look caved in, flattened by rain, or may even have weeds starting to grow on them. The raised ridges are surface tunnels. To see if one is active, find a straight section and gently flatten a one-foot portion with your foot. If the mole is still using that path, it will repair the damage. Check back in 12 to 24 hours. If the ridge is pushed back up, you’ve found an active tunnel.
Test for Recent Activity
Another easy way to test a tunnel is the poke test. Find a surface ridge and gently poke a small hole through the top with a stick or a screwdriver, just big enough to let in light and air. Moles don’t like having their tunnels exposed, so if one is using that route, it will come back to plug the hole with soil. Mark the spot with a flag or stick so you can find it again easily. If you return later that day or the next morning and find the hole sealed up, you’ve confirmed a mole has been through recently. This is a prime location for setting one of your mole traps.
Distinguishing Active vs. Abandoned Tunnels
Moles create two different kinds of tunnels, and knowing the difference is crucial. They have complex, winding tunnels where they search for worms and grubs. These are their feeding areas. Then they have main tunnels, which are usually long and relatively straight. Think of these as their expressways. According to turfgrass specialists at Kansas State University, it’s best to set traps in these main traveling tunnels because the moles use them more frequently and predictably. Following a straight ridge or a path that connects two sets of mounds is often your best bet for finding one of these high-traffic routes.
Which Mole Traps Work Best?
When you’re dealing with a mole problem, you want a solution that works fast. There are several types of mole traps on the market, and understanding how each one functions will help you pick the right tool for the job. Some traps are set above ground, while others work inside the tunnel system. Let’s walk through the most common options and what makes a trap truly effective, so you can reclaim your yard with confidence. The best trap is one that is not only powerful but also easy for you to set correctly and safely.
Cinch Traps: The Scissor-Style Solution
Scissor-style traps, like our handmade Cinch Traps for moles, are designed to be placed directly inside an active tunnel. They work with two sets of powerful jaws that close quickly and humanely when a mole moves through and triggers the mechanism. Because they are set below ground, they are out of sight and less likely to be disturbed. This design is highly effective because it targets the mole in its natural environment. The key is placing the trap in a main runway, where the mole is guaranteed to travel. Their durable, galvanized steel construction means you can count on them season after season.
Harpoon Traps
Harpoon traps are set above ground, directly over a mole’s surface run. When a mole travels through the tunnel below, it pushes up on a trigger pan, which releases a set of sharp spikes, or harpoons, into the ground. The main appeal of this design is that you don’t have to dig as much to set them, making them seem simpler to use. However, their effectiveness can depend on how well you identify a shallow, active run. If the mole doesn’t push up on the trigger with enough force or in the right spot, the trap may not activate correctly.
Choker Loop Traps
A choker loop trap is another in-tunnel option that uses wire loops set inside the mole run. As the mole moves through the tunnel to clear the dirt you used to block its path, it pushes against a trigger. This action causes the loops to snap shut around the mole. Like scissor traps, these are placed below ground and out of sight. Success with choker loop traps relies heavily on precise placement. You need to ensure the tunnel is shaped correctly so the mole passes directly through the loops instead of digging around them.
What Makes a Trap Effective?
The design of a trap is only part of the equation. True success comes down to placement and strategy. No matter which trap you choose, its effectiveness hinges on a few key factors. First, you must place it in an active, main tunnel, not an old feeding run. Second, the trap needs to be set firmly so it doesn’t wobble. Moles are sensitive to disturbances and will simply dig around or under anything that feels unnatural. This is why learning how it works and correctly bedding the trap is so important. When set properly, an effective trap should produce results within a day or two.
Find the Perfect Spot for Your Mole Trap
Having the right tool for the job is essential, but when it comes to trapping moles, location is everything. You could have the most effective mole trap on the market, but if you place it in the wrong spot, you’ll just be wasting your time. Moles create a complex network of underground tunnels, but they don’t use all of them with the same frequency. Think of it like a highway system with main interstates and smaller side roads.
Your goal is to place your trap on the mole’s daily commute, not on a scenic route it only took once. The key is to distinguish between the shallow, temporary feeding tunnels and the deeper, more permanent travel tunnels. Placing your trap in a high-traffic area dramatically increases your chances of a quick and successful catch. It’s the difference between setting up a lemonade stand on a busy street corner versus a quiet cul-de-sac. Before you even think about setting your trap, take a few minutes to survey your yard and map out the mole’s activity. This little bit of detective work will pay off, saving you frustration and helping you reclaim your lawn much faster.
Identify the Main Travel Tunnels
First things first, you need to find the mole’s highway. Moles create two main types of tunnels: shallow feeding runs that you see as raised ridges in your lawn, and deeper travel tunnels that connect different feeding areas. While you might be tempted to place a trap in the most obvious surface run, it’s best to target the main travel tunnels. According to researchers at Kansas State University, it’s best to “set traps in the traveling runs because the moles will come back through them more often.” These tunnels are the mole’s primary routes, and they use them repeatedly. Look for tunnels that run in straighter lines, often along a fence, foundation, or other permanent landscape feature.
Look for Intersections
Once you’ve identified a main travel tunnel, see if you can find where it connects with another one. An intersection is the absolute best place to set a trap. Just like a busy intersection in a city, these junctions see the most traffic, which significantly improves your odds of catching the mole. To find one, follow a main tunnel and look for points where it branches off or is joined by another active run. Placing your trap here ensures you’re covering multiple paths of travel. This strategic placement maximizes your trap’s effectiveness and gives you the best possible chance of resolving your mole problem quickly.
Avoid Shallow Surface Runs
Those winding, raised ridges you see just under the surface of your grass are feeding tunnels. Moles create these as they search for worms and grubs, and they often use them only once before moving on. Placing a trap in one of these shallow runs is one of the most common trapping mistakes. The mole may have already gotten what it came for and has no reason to return to that specific tunnel. Instead, focus your efforts on the deeper, more established travel tunnels we discussed earlier. You can find these by probing the ground between two fresh molehills. Targeting these main arteries is what truly makes the difference in effective mole control.
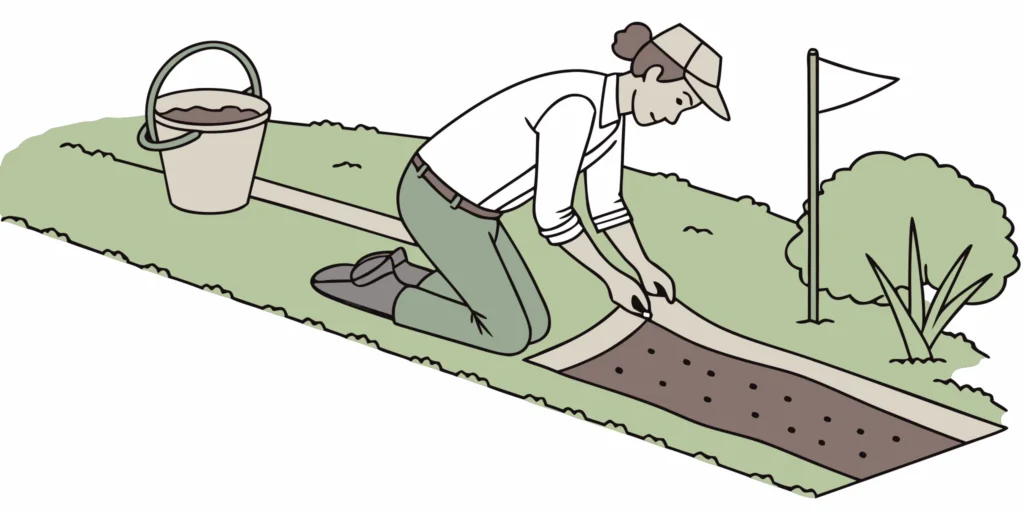
How to Set Your Mole Trap, Step by Step
Once you’ve found the perfect spot, setting your trap is a straightforward process. It’s less about force and more about finesse, making the trap feel like a natural part of the mole’s environment. Following these four steps carefully will give you the best chance at a successful catch, so you can get back to enjoying your lawn and garden without those frustrating mounds and ridges. Let’s walk through exactly how to do it.
Prepare the Tunnel
Your first move is to get the tunnel ready for the trap. You want to place your trap in a main travel runway, not a temporary feeding tunnel where the mole may not return. According to researchers at Kansas State University, “it’s best to set traps in the traveling runs because the moles will come back through them more often.” To prepare the spot, use a trowel to carefully dig out a section of the tunnel just large enough to fit your trap. Clear out any loose dirt, small rocks, or roots so the trap can sit flat and function without any issues. A clean setup is the foundation for an effective trap.
Position the Trap
Now it’s time to place the trap. The key is to make it seem like a seamless part of the tunnel system. Proper positioning is one of the most important parts of the process. Experts advise that “aligning the trap with the mole run, removing obstructions from the jaws of the trap, and making an obstruction in the mole run” are crucial for success. Make sure your mole trap sits snugly on the floor of the tunnel, with the jaws lined up with the direction of the runway. The mole should be able to travel straight through it without sensing that anything is out of place.
Set the Trigger
With the trap in position, you can set the trigger. This is the part that does the work, so it needs to be handled correctly and safely. Cinch Traps are designed to be both sensitive and effective. As our guide to professional traps explains, “The best traps are designed to activate with a simple bump from the mole as it moves through its tunnel, clearing the dirt.” Carefully follow the instructions for your specific trap model to engage the trigger mechanism. You want it to be sensitive enough to spring when a mole pushes through, but not so sensitive that it goes off while you’re still setting it up. Take your time with this step.
Cover and Camouflage the Trap
The final step is to cover your set trap. Moles are sensitive to light and drafts, so an exposed trap will likely make them turn around and dig a new tunnel, avoiding your setup entirely. To make the area inviting, you need to block all light. As trapping experts recommend, you should “back-fill the soil so no light can get in and make the mole avoid that area of the run.” You can place a piece of sod over the hole or even an upside-down bucket. This not only camouflages the trap from the mole but also keeps it safe from curious pets or children. Once covered, all you have to do is wait.
Safety Tips for Setting Mole Traps
Setting a mole trap is straightforward, but it’s important to handle the process with care. Your goal is to remove the mole efficiently, and that includes making sure you, your family, and your pets stay safe. A little bit of preparation and mindfulness goes a long way. By following a few key safety practices, you can ensure your trapping efforts are successful without any unwanted surprises. Think of it as a professional setup: you’re using the right gear and the right technique to get the job done correctly and safely from the start.
Wear Gloves to Mask Your Scent
First things first, always wear gloves when handling and setting your mole traps. This isn’t just about keeping your hands clean; it’s a critical step for success. Moles may not see well, but they have a powerful sense of smell and can easily detect human scent. If you handle a trap with your bare hands, you’re leaving behind a warning signal that can make a mole avoid the area entirely. A simple pair of leather or canvas garden gloves is all you need to mask your scent and keep the trap from smelling suspicious to your target. This simple step makes a huge difference in how quickly you’ll see results.
Keep Pets and Children Safe
If you have curious pets or little ones running around, their safety is your top priority. Always be mindful of where you place your traps. One of the benefits of using Cinch Traps is that they are set below the ground, which significantly reduces the risk of accidental contact compared to above-ground models like harpoon traps. To be extra safe, mark the location of each set trap with a small flag or stick. This reminds you where they are and helps you keep kids and pets away from the immediate area. When your traps are active, it’s a good idea to supervise outdoor playtime or keep pets on a leash.
Use Your Tools Correctly
Properly using your trap is essential for both safety and effectiveness. Every trap is a tool, and like any tool, you need to understand how it works before you start. Take a moment to read the instructions that come with your specific trap. For Cinch Traps, our step-by-step guide shows you exactly how to prepare the tunnel and set the trigger mechanism safely. Making sure the trap is set correctly prevents it from misfiring while you’re handling it and ensures it functions perfectly when the mole arrives. A secure and properly set trap is a safe and effective trap.
How Often Should You Check Your Traps?
Setting your mole traps is a great first step, but the real work begins with consistent monitoring. This isn’t a “set it and forget it” situation. To get the best results and clear your yard of moles efficiently, you need to make checking your traps part of your daily routine. Regular checks allow you to know right away when you’ve had a successful catch, when a trap has been falsely triggered, or when it’s time to move a trap to a more active tunnel. Staying on top of your traps is the fastest way to solve your mole problem for good.
Check Your Traps Daily
Make it a habit to check your traps at least once a day, maybe once in the morning and once in the evening. This frequency is your best bet for catching moles quickly. When a mole is caught, you can remove it promptly, which is more humane and keeps the trapping area clear for any other moles that might be using the same tunnel system. Daily checks also let you see if a trap was sprung without a catch, giving you a chance to reset it immediately. Consistent monitoring is the key that turns a good trapping strategy into a great one.
What to Do After a Successful Catch
You’ll know you’ve caught a mole when you see the Cinch Trap’s spring is down and the lever is out. Congratulations! Your persistence paid off. Put on a pair of gloves before handling the trap. Carefully remove the trap and the mole from the ground. You can then dispose of the mole according to your local regulations. If you suspect there are more moles in the area, you can reset one of your mole traps in the same tunnel. Moles are solitary, but another one might move in to claim the empty territory.
How to Handle a False Trigger
Don’t be discouraged if you find a sprung trap with nothing in it. This is actually a good sign. A false trigger, or a trap that’s been plugged with dirt, tells you that a mole has recently passed through and the tunnel is definitely active. It just means the mole pushed dirt into the trap without getting caught. Simply clear the dirt, make sure the trap mechanism is unobstructed, and carefully reset it in the exact same spot. This kind of feedback is valuable, confirming you’re in the right place to make a catch. If you run into other issues, our FAQs page has answers to common questions.
Common Mole Trapping Mistakes to Avoid
Even with the most effective trap on the market, a few common slip-ups can stand between you and a mole-free yard. It’s easy to get frustrated when your traps aren’t working, but the issue often comes down to a simple mistake in your strategy or setup. Moles are creatures of habit, but they’re also sensitive to disturbances in their environment. Understanding their behavior is key to avoiding the pitfalls that can send them digging in the other direction.
From choosing the wrong tunnel to handling the trap incorrectly, these errors are completely avoidable once you know what to look for. We’ll walk through the four most frequent mistakes people make when setting mole traps. By sidestepping these issues, you can make sure your efforts are successful and get your lawn back to being yours. Let’s get your trapping technique perfected so you can see results, fast.
Trapping in an Inactive Tunnel
One of the biggest reasons a trap fails is because it’s placed in a tunnel the mole no longer uses. You might see a network of ridges and mounds across your lawn and assume any spot is a good spot, but that’s rarely the case. Moles create extensive feeding tunnels that they may only use once. The real key is to find their main travel tunnels, which they use repeatedly like underground highways. As experts from Kansas State University note, it’s best to set traps in the traveling runs because moles pass through them more frequently. Before setting your trap, always confirm you’ve found an active tunnel by pressing down a small section and checking if it’s repaired within a day or two.
Placing the Trap Incorrectly
Once you’ve found the perfect active tunnel, the placement of the trap itself is critical. A poorly positioned trap can be easily bypassed or buried by a mole as it pushes dirt to clear the tunnel. Your trap should sit squarely within the run, aligned with the direction of the tunnel. For scissor-style traps like our Cinch Traps, you need to ensure the jaws can close without being obstructed by roots or rocks. The goal is for the mole to travel directly through the trap without suspecting a thing. Take a moment to dig a clean opening that matches the trap’s footprint and set it firmly in the base of the tunnel for the best chance of success.
Disturbing the Area Too Much
Moles have a keen sense of smell and are wary of changes to their tunnels. If you disturb the area too much, leave a strong human scent, or let light into the tunnel, a mole will likely get suspicious and avoid the area altogether. Always wear gloves when handling your trap to mask your scent. When you dig the hole to place the trap, be as neat as possible. After the trap is set, carefully place a piece of sod or a bucket over the opening to block all light. This recreates the natural darkness of the tunnel and prevents the mole from detecting anything out of the ordinary.
Setting the Trigger Improperly
The trigger mechanism is the heart of the trap, and setting it correctly is essential. If the trigger is too sensitive, it might go off from falling dirt or vibrations. If it’s not sensitive enough, the mole might push right past it without setting it off. The best traps are designed to activate when the mole pushes dirt to clear the path. Make sure you understand exactly how your trap works and follow the instructions carefully. For Cinch Traps, the trigger should be set so that the slightest forward pressure from the mole will activate it. A properly set trigger ensures a quick and effective catch every time.
Watch and Learn: The Best Mole Trapping Videos
Sometimes, reading instructions just isn’t enough. When you’re trying to figure out the exact placement of a mole trap or how to properly set the trigger, seeing it done can make all the difference. Visual guides help take the guesswork out of the process, giving you the confidence to set your traps correctly on the first try. A well-made video can show you the subtle details that instructions might miss, like how to find the perfect spot in a main tunnel or how to handle the trap without leaving your scent behind.
Thankfully, there are plenty of excellent video resources available that walk you through every step. From university experts who study mole behavior to seasoned pest control professionals who trap moles for a living, you can learn from the best in the business. These videos offer different perspectives and techniques, so you can find a method that works for you and your yard. We’ve gathered a few of our favorite types of tutorials to help you get started. Watching a few of these will give you a much clearer picture of how to successfully and efficiently get rid of your mole problem for good.
University Extension Demos
If you’re looking for reliable, research-backed advice, university extension programs are a fantastic resource. These organizations are dedicated to providing practical, unbiased information to the public. Their videos often feature turfgrass and wildlife specialists who can explain the science behind mole behavior and why certain trapping methods are more effective than others. For example, Kansas State University offers a great video that shows you exactly how to trap moles with clear, step-by-step instructions. These demos are perfect for anyone who wants to understand the process from a scientific perspective and learn techniques that are proven to work.
Videos from Pest Control Pros
Want to learn from someone who deals with mole infestations every single day? Turn to videos from pest control professionals. These experts are in the trenches, so they know all the little tricks that can lead to a successful catch. They often share practical tips you won’t find in a manual, like how to adapt your strategy for different soil types or tricky tunnel systems. You can find countless tutorials from pros on YouTube, like this one from Smith’s Pest Management that shares essential tips on how to properly set a mole trap. Watching these videos is like getting a one-on-one lesson from a seasoned expert.
Cinch Traps Tutorials
Of course, the best way to learn how to use a specific product is to hear from the people who designed it. Our Cinch Traps are handmade in Oregon and built to last a lifetime, with a simple yet incredibly effective design. The best traps are designed to activate with a simple bump from the mole as it moves through its tunnel, clearing the dirt. To see this in action, you can check out our own video tutorials that show you exactly how it works. We walk you through finding the main runway, preparing the tunnel, and setting our gopher and mole traps for a quick and humane catch.
Related Articles
- Get Rid of Moles Overnight? Here’s What Works Fast
- Get Rid of Moles Permanently: What Really Works
- The Most Effective Mole Traps in Portland, Oregon
- Best Professional Mole Trap for Sale: Top 4 Reviewed
- Where to Buy Mole Traps in Oklahoma City?
Frequently Asked Questions
How many traps do I actually need for my yard? While one mole can create a surprising amount of damage, it’s a good idea to start with two or three traps. This allows you to cover a couple of different main tunnels at the same time, which can help you solve the problem faster. If you have a very large property or separate areas of activity, you might consider using more, but starting with a few well-placed traps is a great strategy.
Do I need to use any bait with Cinch Traps? No, you don’t need any bait. Cinch Traps are designed to work based on the mole’s natural behavior. Moles are territorial and will instinctively work to clear any obstruction in their tunnels. When you set the trap correctly, the mole will push against the trigger as it tries to clear the path, which activates the trap. It’s the placement, not the bait, that ensures success.
I found a sprung trap with no mole in it. What went wrong? Don’t be discouraged, this is actually a good sign. It means you’ve found an active tunnel and a mole has definitely been there. Usually, this happens when the mole pushes a lot of dirt ahead of itself, plugging the trap and setting it off without getting caught. Just clear the dirt out of the trap and the tunnel, and reset it carefully in the exact same spot. You’re very close to a catch.
How long should I leave a trap in one spot before moving it? If you’ve confirmed a tunnel is active, give the trap about two to three days in that location. If you haven’t seen any activity at all after that time (the trap hasn’t been sprung or plugged with dirt), it might be time to find a different main tunnel. Moles are creatures of habit, so a trap placed in a high-traffic runway should see some action fairly quickly.
I caught a mole! What should I do now? Great job! First, put on a pair of gloves before handling the trap. Carefully remove the trap and the mole from the tunnel. You can then dispose of the mole according to your local guidelines. Since moles are solitary, you may have solved your problem. However, another mole might eventually move in to claim the empty tunnel system, so it’s a good idea to reset the trap in the same run for a few more days just in case.
